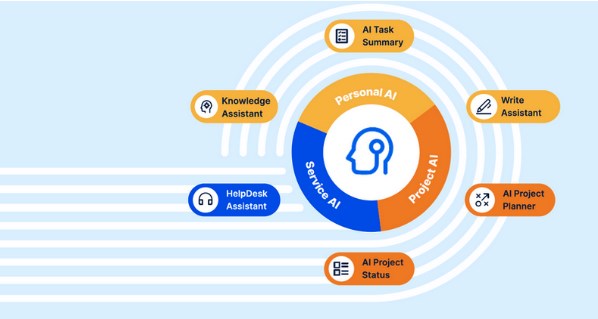
Easy AI
Introduction
Personal AI
Knowledge Assistant
AI Task Summary
Write Assistant
Project AI
AI Project Planner
AI Project Status
Service AI
HelpDesk Assistant
Global Settings
Easy AI settings
Collections
Working with AI prompts
Easy AI Activation per User
Feedbacks
Introduction
Easy AI represents all the features related to AI. There are tiers of usability for specific groups of users: Personal AI can be used by anyone, Project AI is for project managers, and Service AI supports ITSM teams.
There will be no more frustrating searches for information. Easy AI instantly provides answers based on your organization-specific information from connected data sources and information within the system.
To access Easy AI features, users must have the "Easy AI assistants active" option checked in their user profile. If this option is not selected, the user – including administrators – will not see any AI assistants in the application. This setting allows organizations to manage which users can work with AI functionalities.
To best understand how to set up and work with Easy AI, we will go over some basic terms:
- Collections: A collection is a set of data sources with knowledge that the language model uses to answer your questions.
- Prompt templates: A prompt template includes instructions for the language model to specify the response. It represents a use case in which the AI Assistants help. The main prompt templates are built-in and ready to use.
- Assistants: Separate functions of Easy AI, which work for different situations but pull data from the same resources.
Personal AI
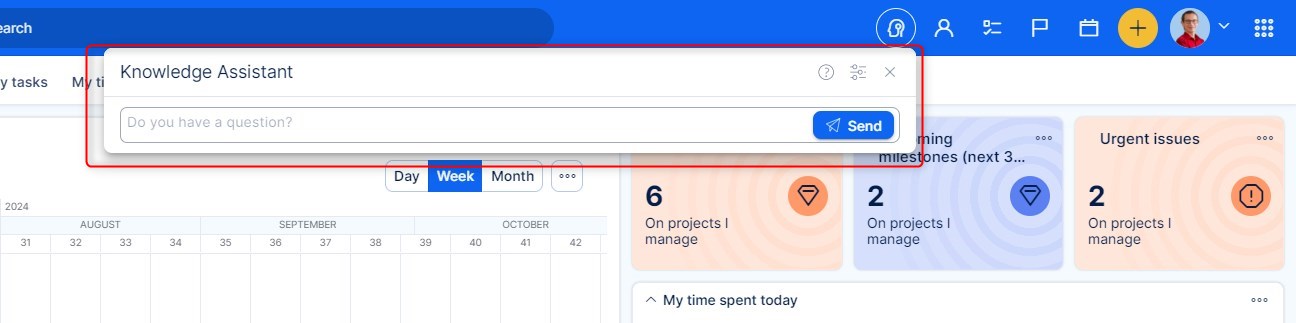
Knowledge Assistant
This feature will help you and your company search and use data resources of your company as well as help you with the use of Easy Project as a system. Below we will describe how to work with this feature to maximize its use.
You can find this feature in the ever-present top menu:

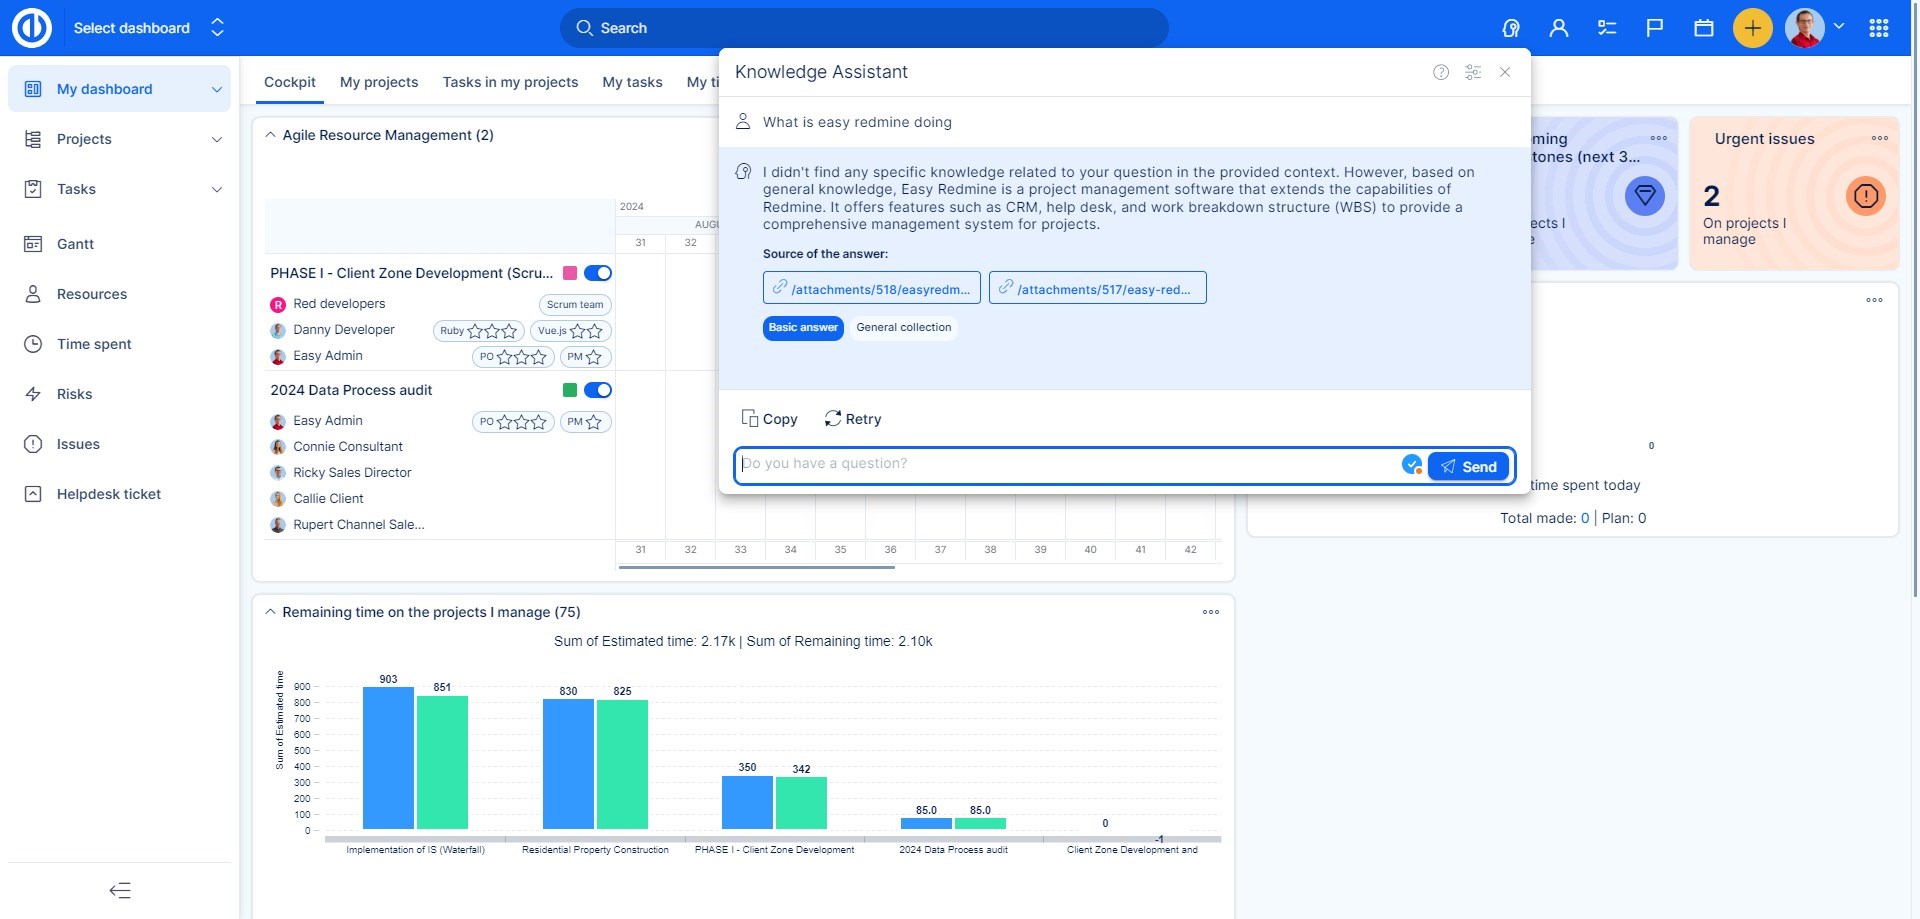
Once you click on the icon, a pop-up will appear, where you simply enter a question and hit Send
For example, we entered a simple question : What is Easy Project doing?
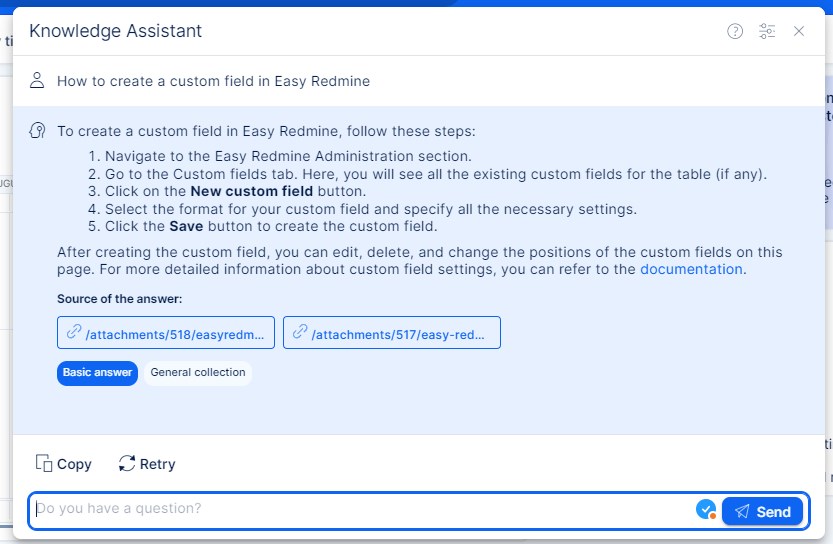
In this net example, we wanted to show how Easy AI can be used in terms of the general usage of the system. "How to create a custom field in Easy Project ?" The answer given by the AI is simple step by step guide to follow. Along with sources and link to our documentation.
In the popup you can find also setup preferences:
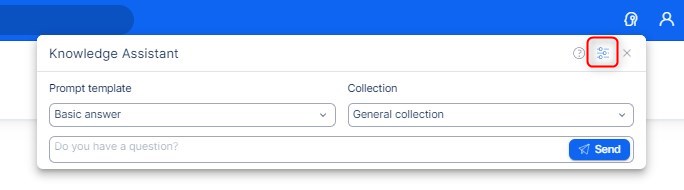
Where you can select prompt template and collection which will be used by default.
Data sources
You are able to upload a company-specific collection of resources. Currently, the following resources are supported, more will come in the future :
- PDF, markdown files – from your knowledge base
- Crawl a web page up to 3 layers deep
- Descriptions, Names and comments from the task database
- Articles from Knowlege Base
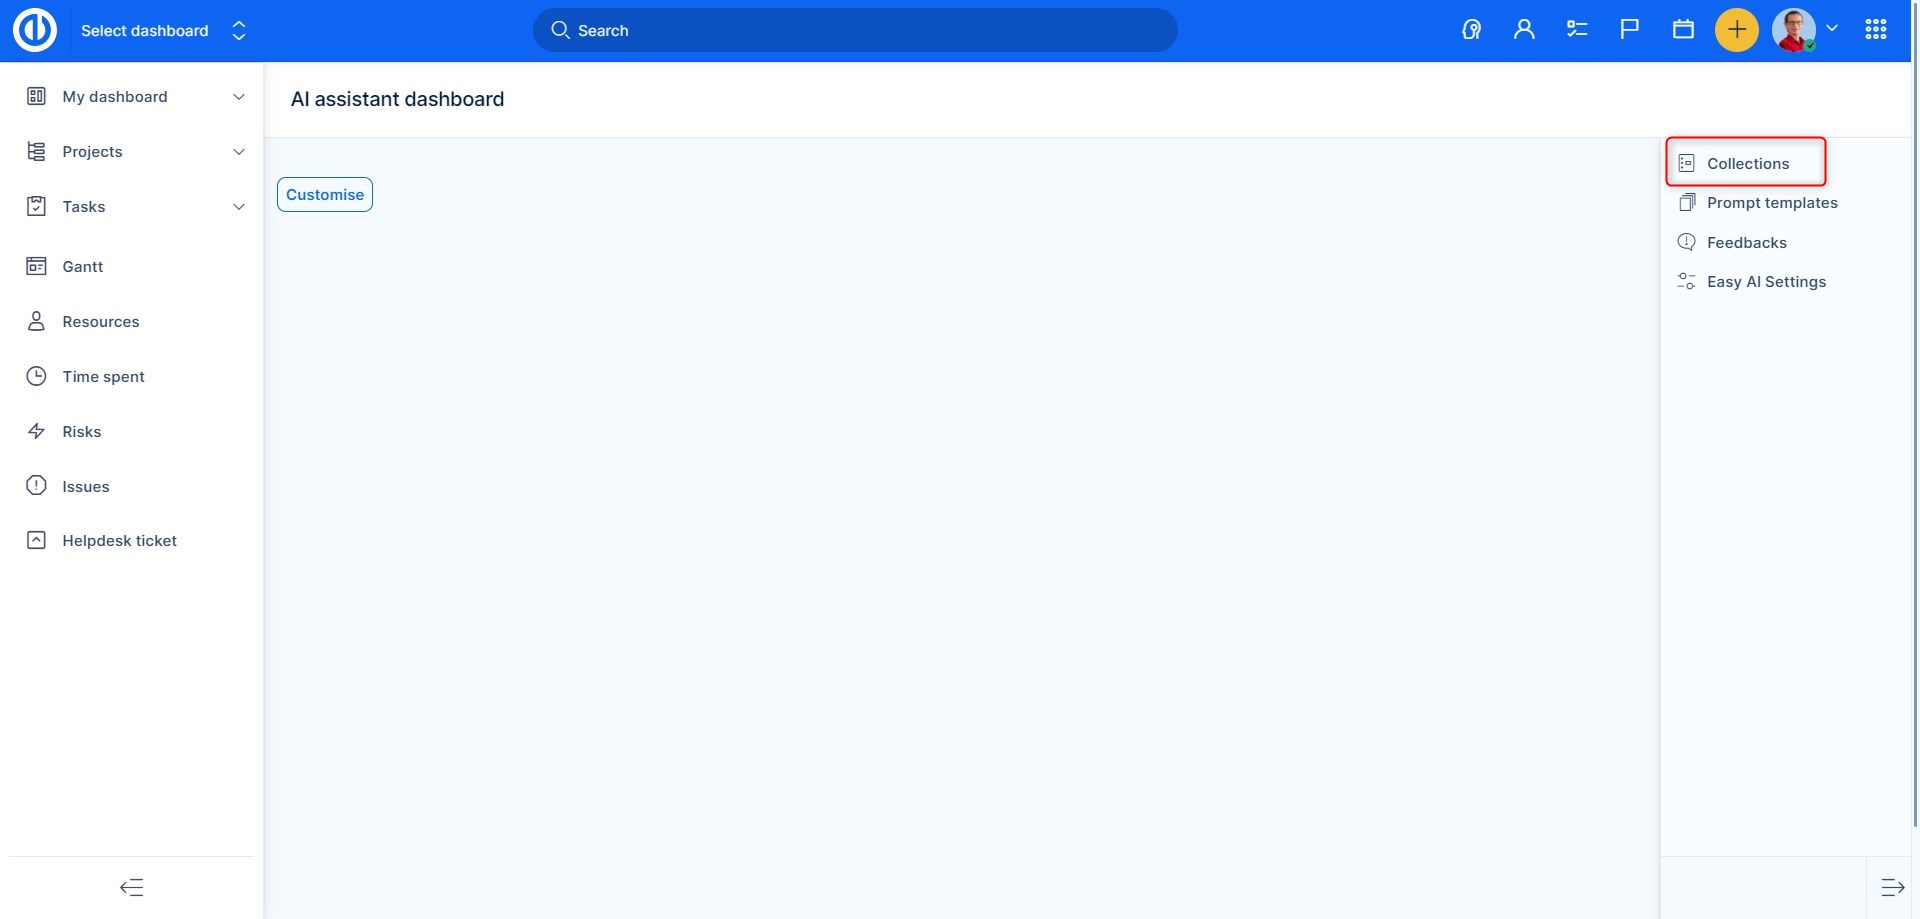
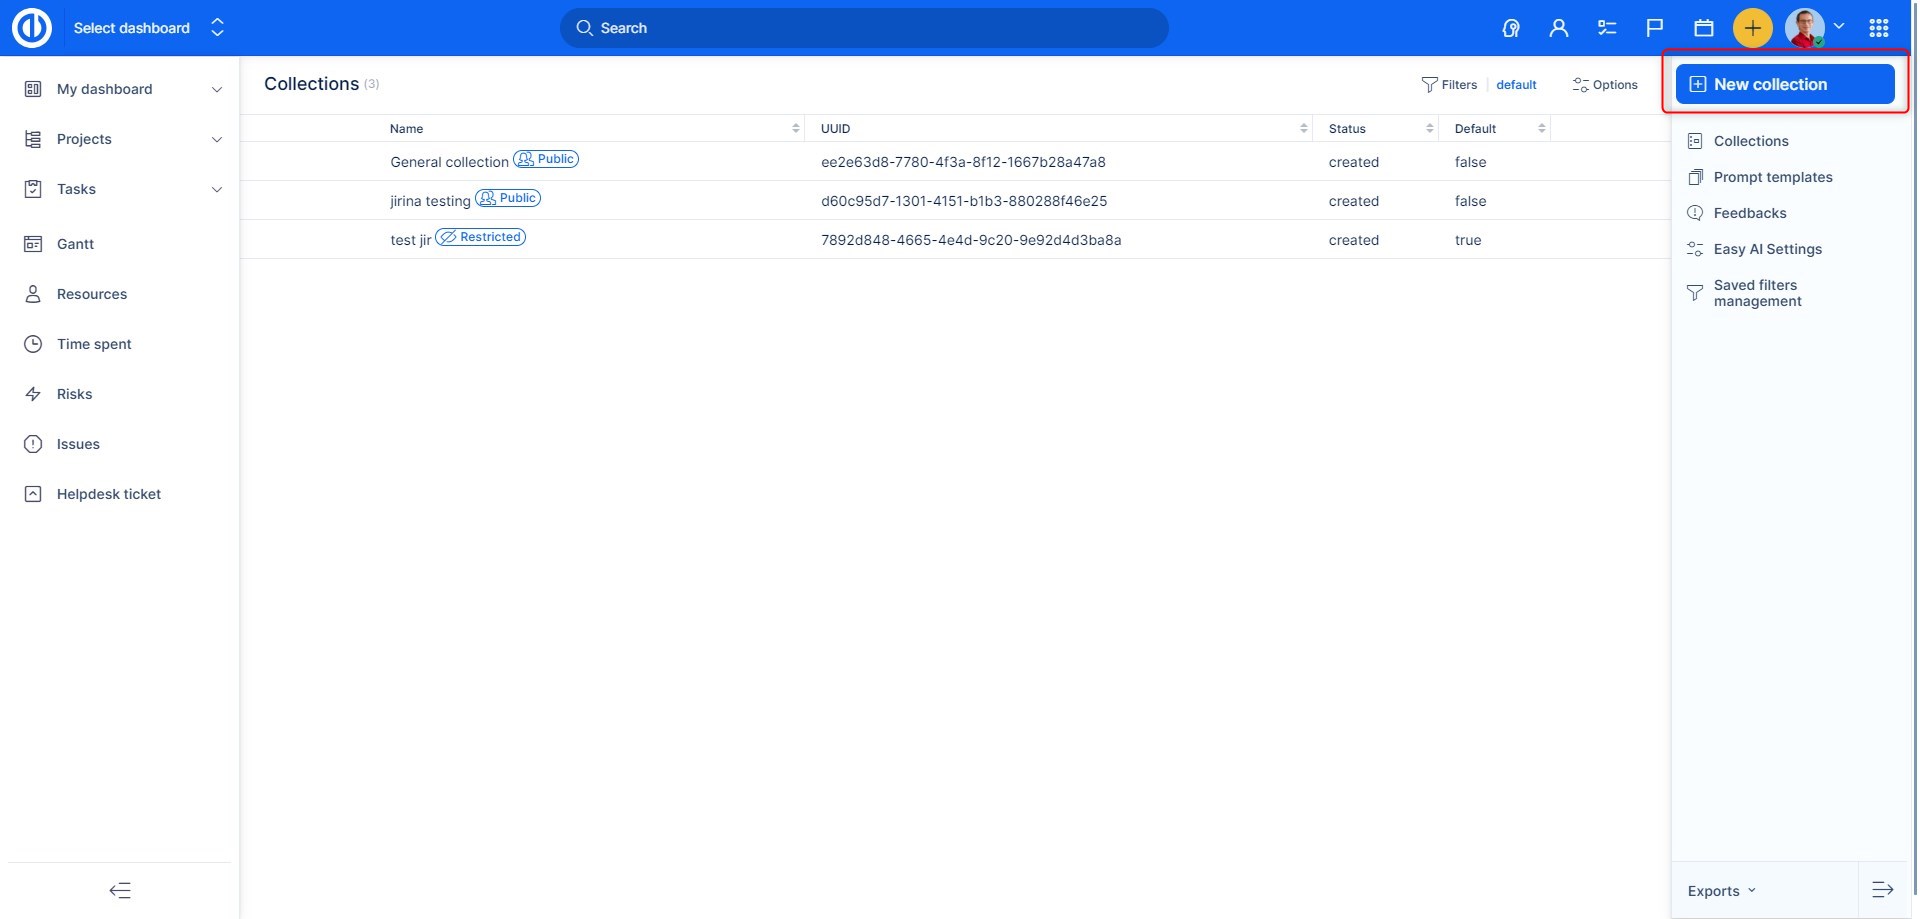
Data sources can be uploaded via Collections. Go to Administration >> AI assistant Dashboard - Collections:
Here you will find the list of existing collections as well as an option to create a new one.
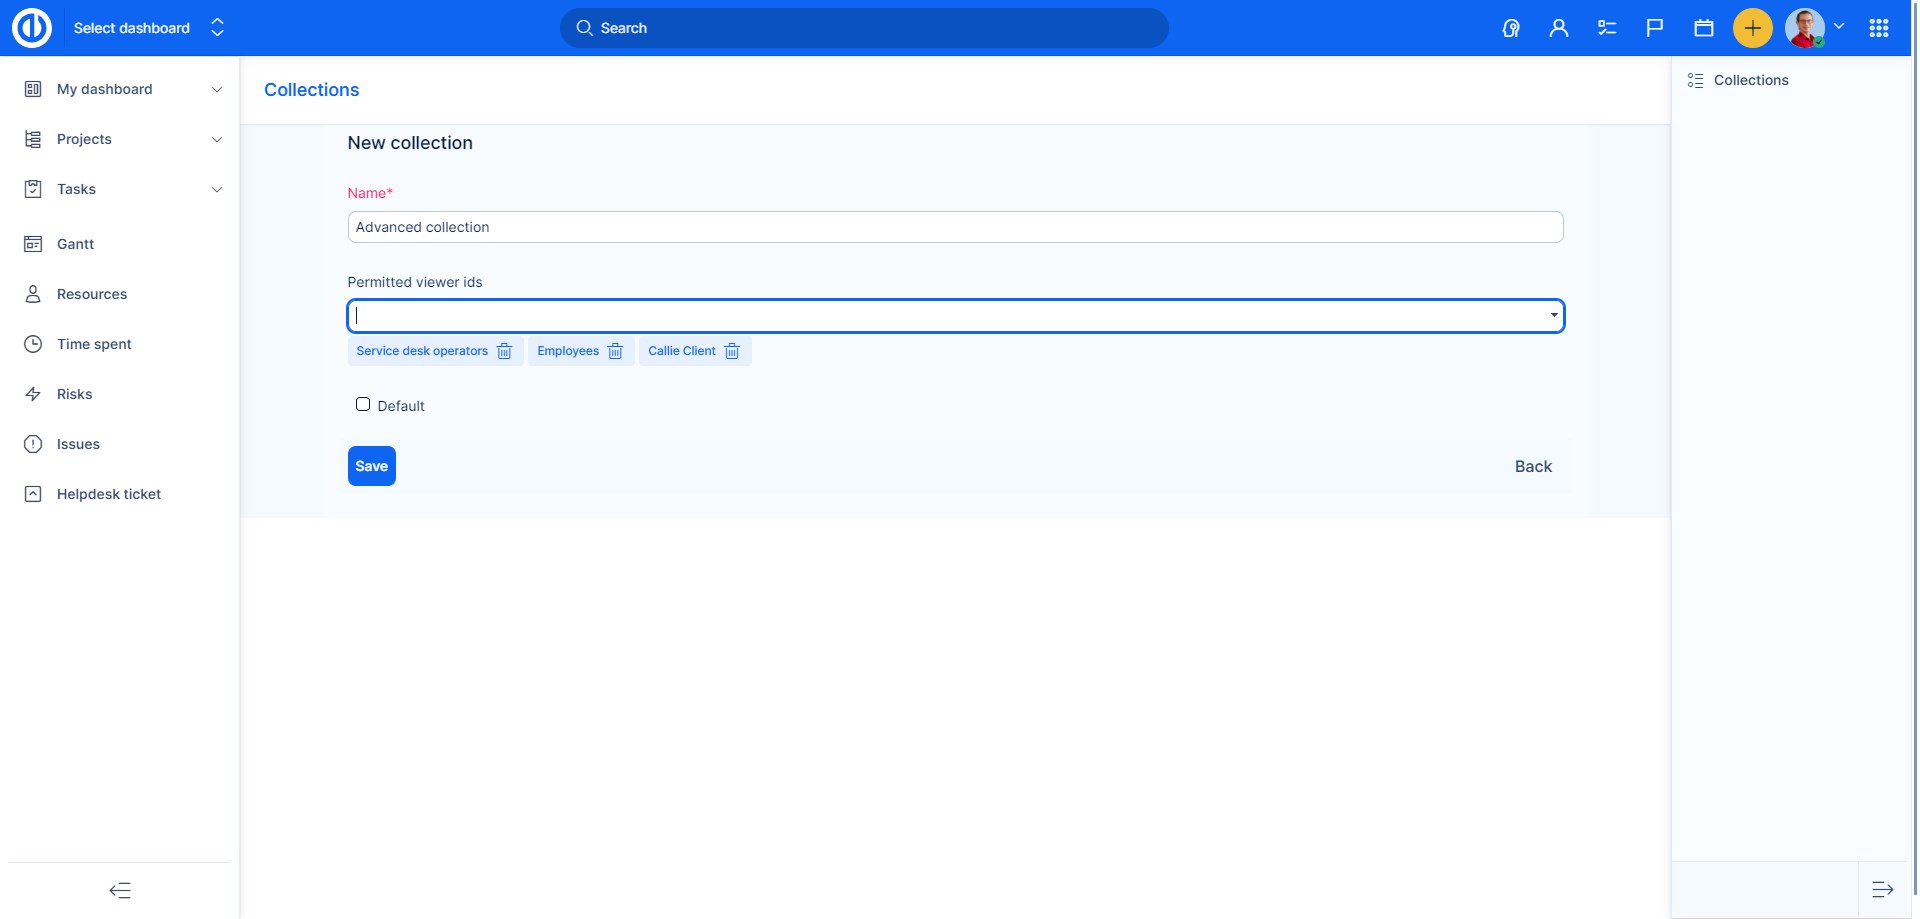
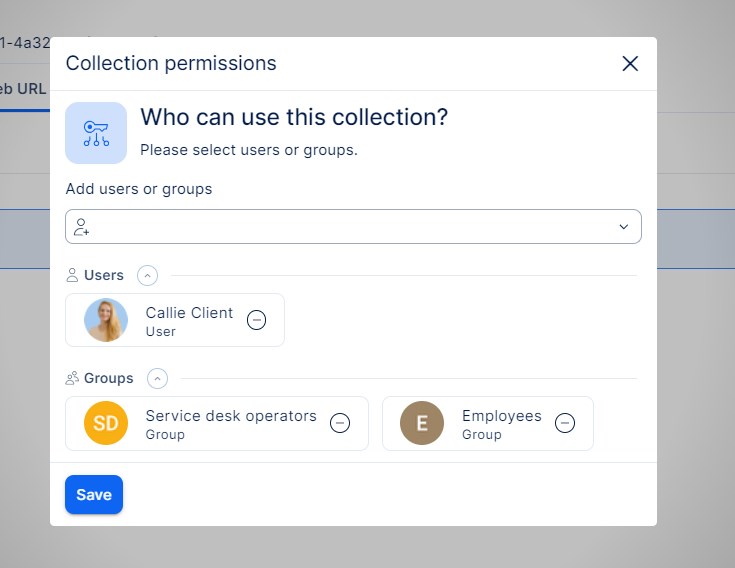
The new collection page will let you name the collection and also let you restrict access to this collection. If you do not select any users or groups. This collection will be visible and accessible to anyone. If you select some users and groups, only the selected will have access to the data.
The collections will be marked accordingly: 
Here is an example of selected users:
Once you save the new collection, you will be redirected to the collection settings. Where you can upload data by type:
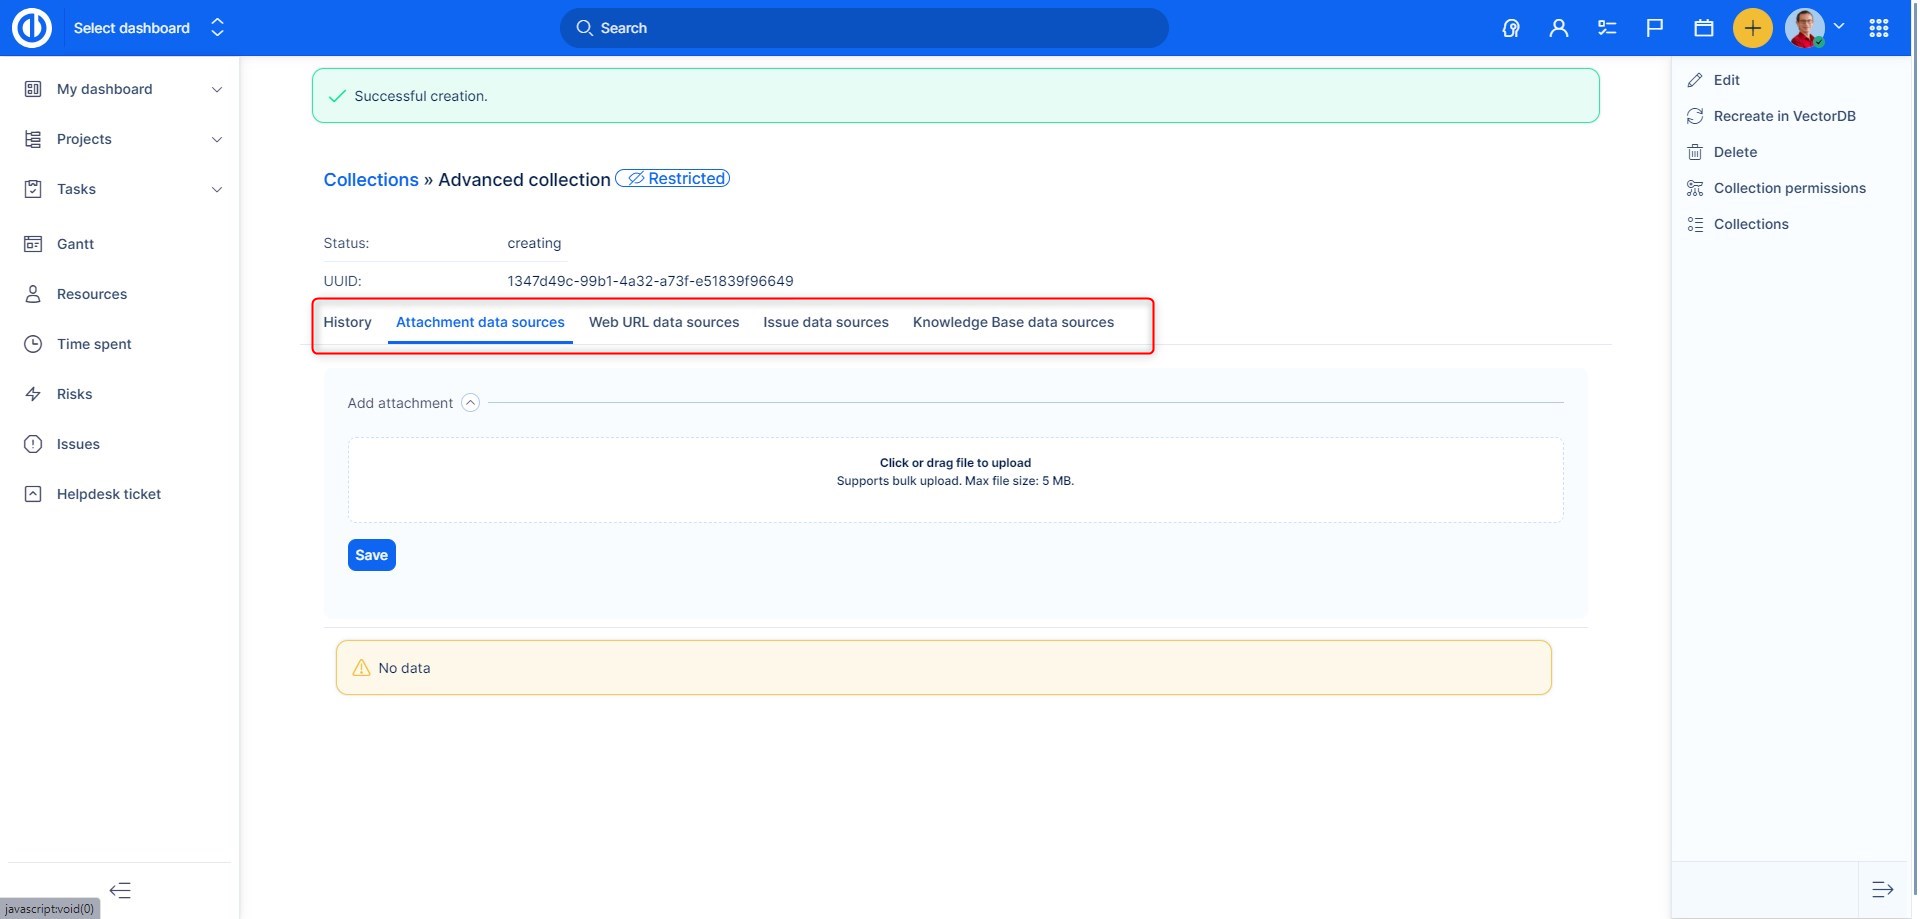
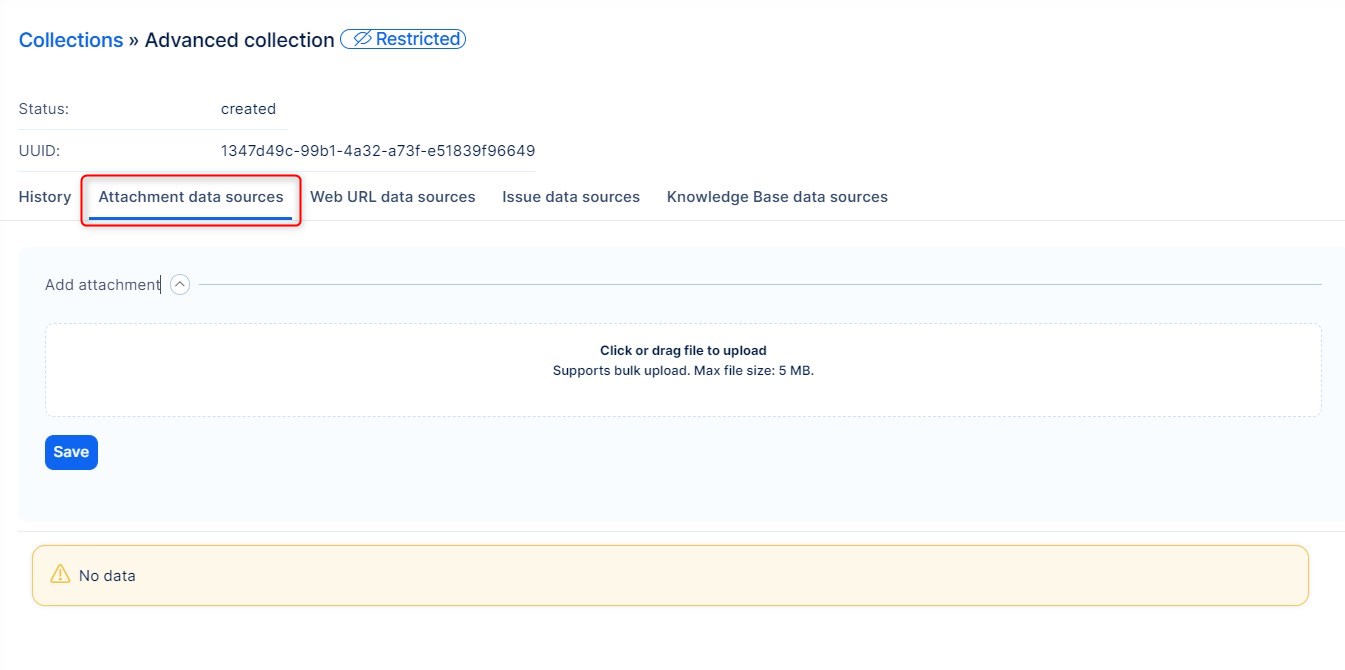
- PDF and Markdown can be uploaded under Attachment data sources:
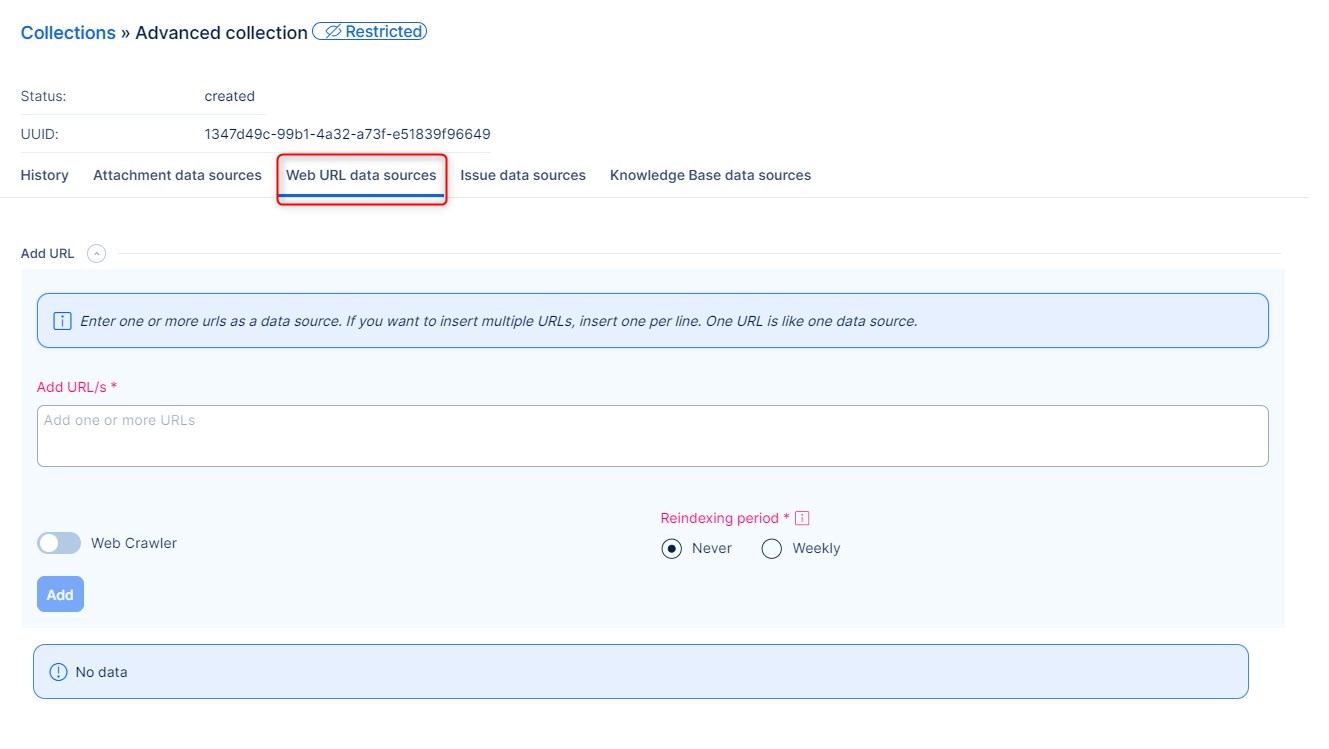
- Web URL data sources will let you enter a URL:
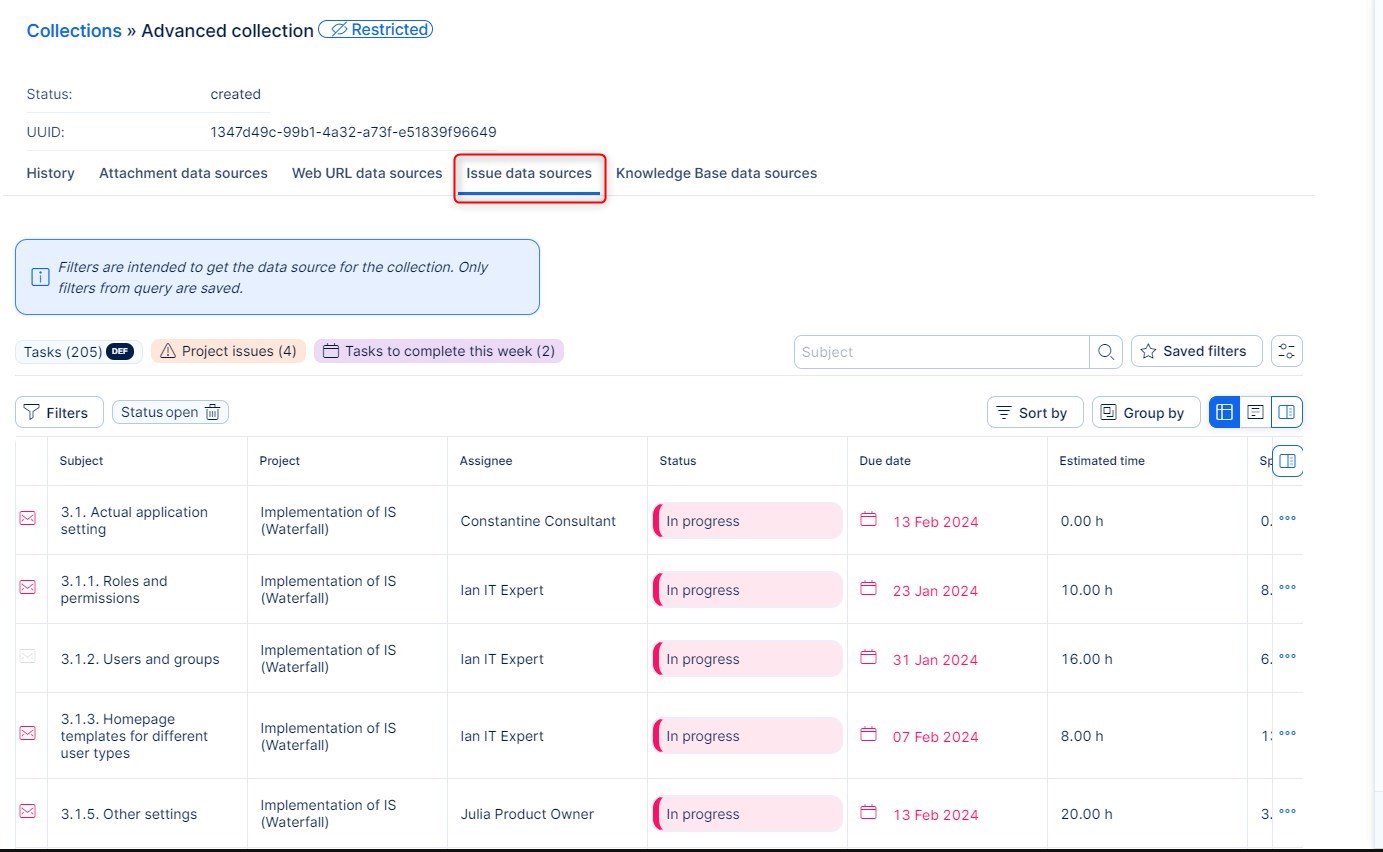
- Under Issue data sources you will find an option to create a filter, so only selected tasks will be used as a resource:
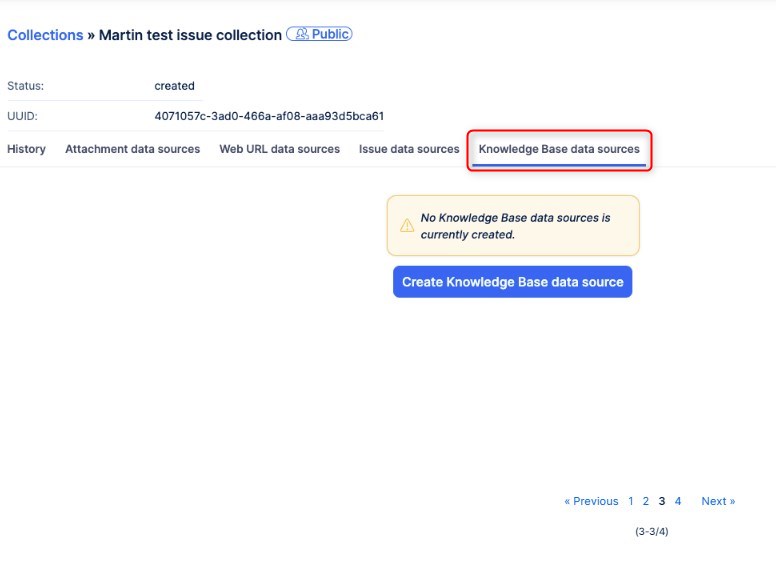
- Knowledge Base data sources enable you to select from your Knowledge base. The Knowledge base needs to be active and connected to your Easy Project in order to create the data source.
In each collection you will find the following options:
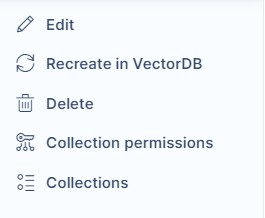
- Edit will let you rename the collection and change restrictions at once.
- Recreate in VectorDB is to be used if there is a need for reindexing existing data sources in case of an issue, or error, or change.
- Delete lets you delete a collection. Please use this button wisely. This step is irreversible.
- Collection permissions is a more visual way of adding and removing users:
- Collections will get you to the collections list.
Resources uploaded in the Knowledge Assistant are used for many other assistants, giving them the organization-specific context on top of general LLM knowledge.
Here are the main functions and uses of this feature:
- One shared source of information leads to consistent language across the whole organization
- Organization-specific abbreviations will not be a mystery to newcomers anymore
- Streamline your workflows by getting real-time assistance in finding relevant answers to make informed decisions.
- Knowledge assistant is trained on your company knowledge and acts as an always-available senior colleague to discuss things with
- Knowledge assistant is also trained to answer questions about Easy Project, and how to use and set it up.
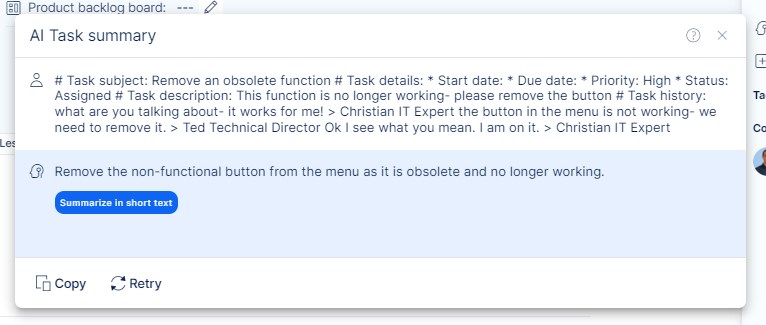
AI Task Summary
Task summary helps you with understanding what is happening on a task without the need to read each and every interaction within it.
This function can be found on tasks in the right-side menu:

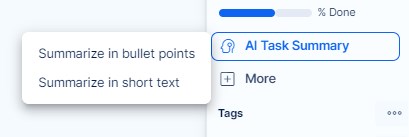
By clicking on it, you will be presented with two options of output. Short text or Bullet points.
Here are examples of how each output can look.
- Short text:
- Bullet points:
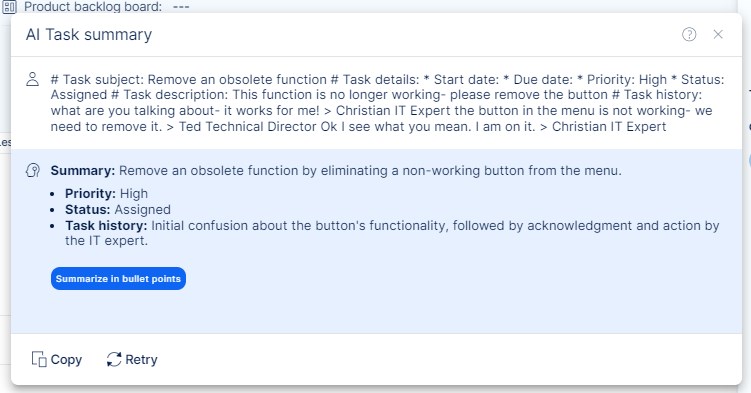
Each result can be "retried" if it is not clear enough. Or you can copy the result and paste it into a new comment or wherever you´d like.

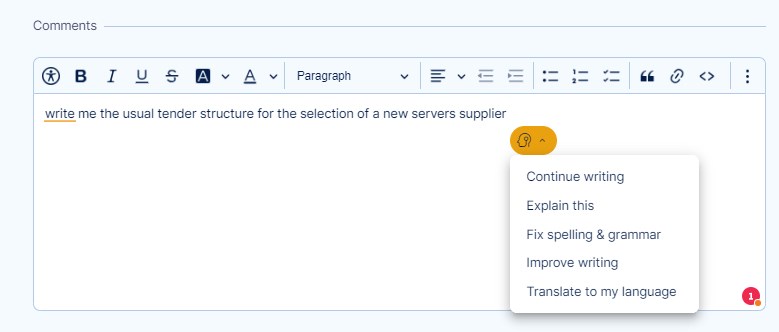
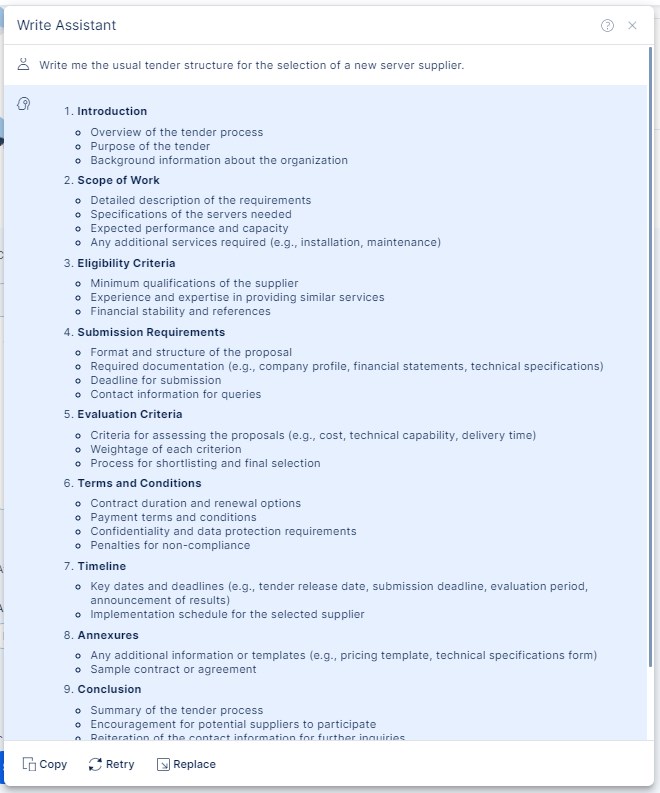
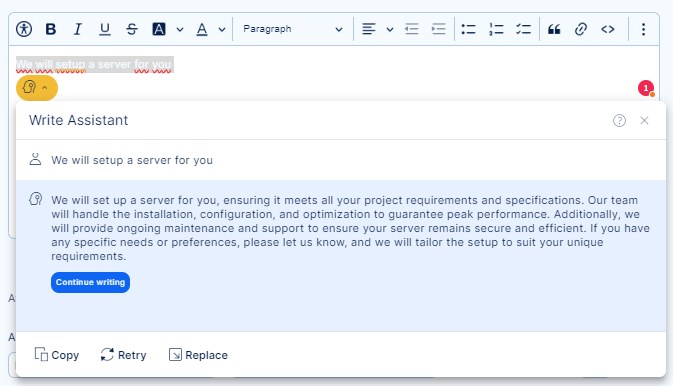
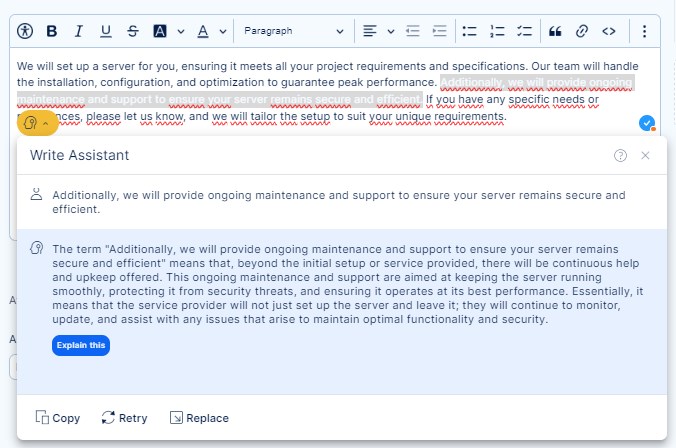
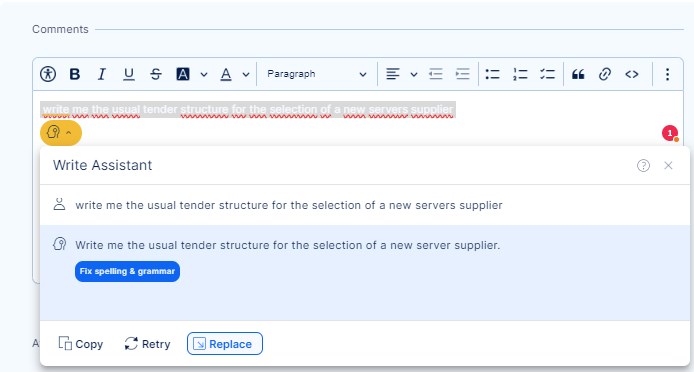
Write Assistant
Write assistant is available in text fields throughout the system: task description, project description and comments. It will appear as a yellow icon once you start to type, or when you paste or select any text in the text field. This feature has several options to use with your text.
All results can be copied, or you can directly replace your text with the AI-generated one. You can also click the "retry" button if the result is not exactly what you are looking for.
- Continue writing - this option will finish a message, or it will provide you with the desired information. Here are some examples:
- Explain this - this feature will help you, if there is anything you need help with understanding a bit more, be it a whole text, or just a word.
- Fix spelling and Grammar - As the name suggests, this function helps to fix any spelling or grammar mistakes. Which is essential in professional communication.
- Improve writing - this feature will also help with grammar and spelling. But apart from that, it will also overhaul the overall text, making sure that the writing is easy to understand and free of unnecessary words. Organizing ideas logically so that the text flows smoothly from one point to the next. Adapting the writing style and tone to suit the intended audience and purpose. Reviewing and revising the text to correct errors and improve overall quality.
- Translate to my language - Lets you translate text to your language based on your user profile.
Project AI
AI Project Planner
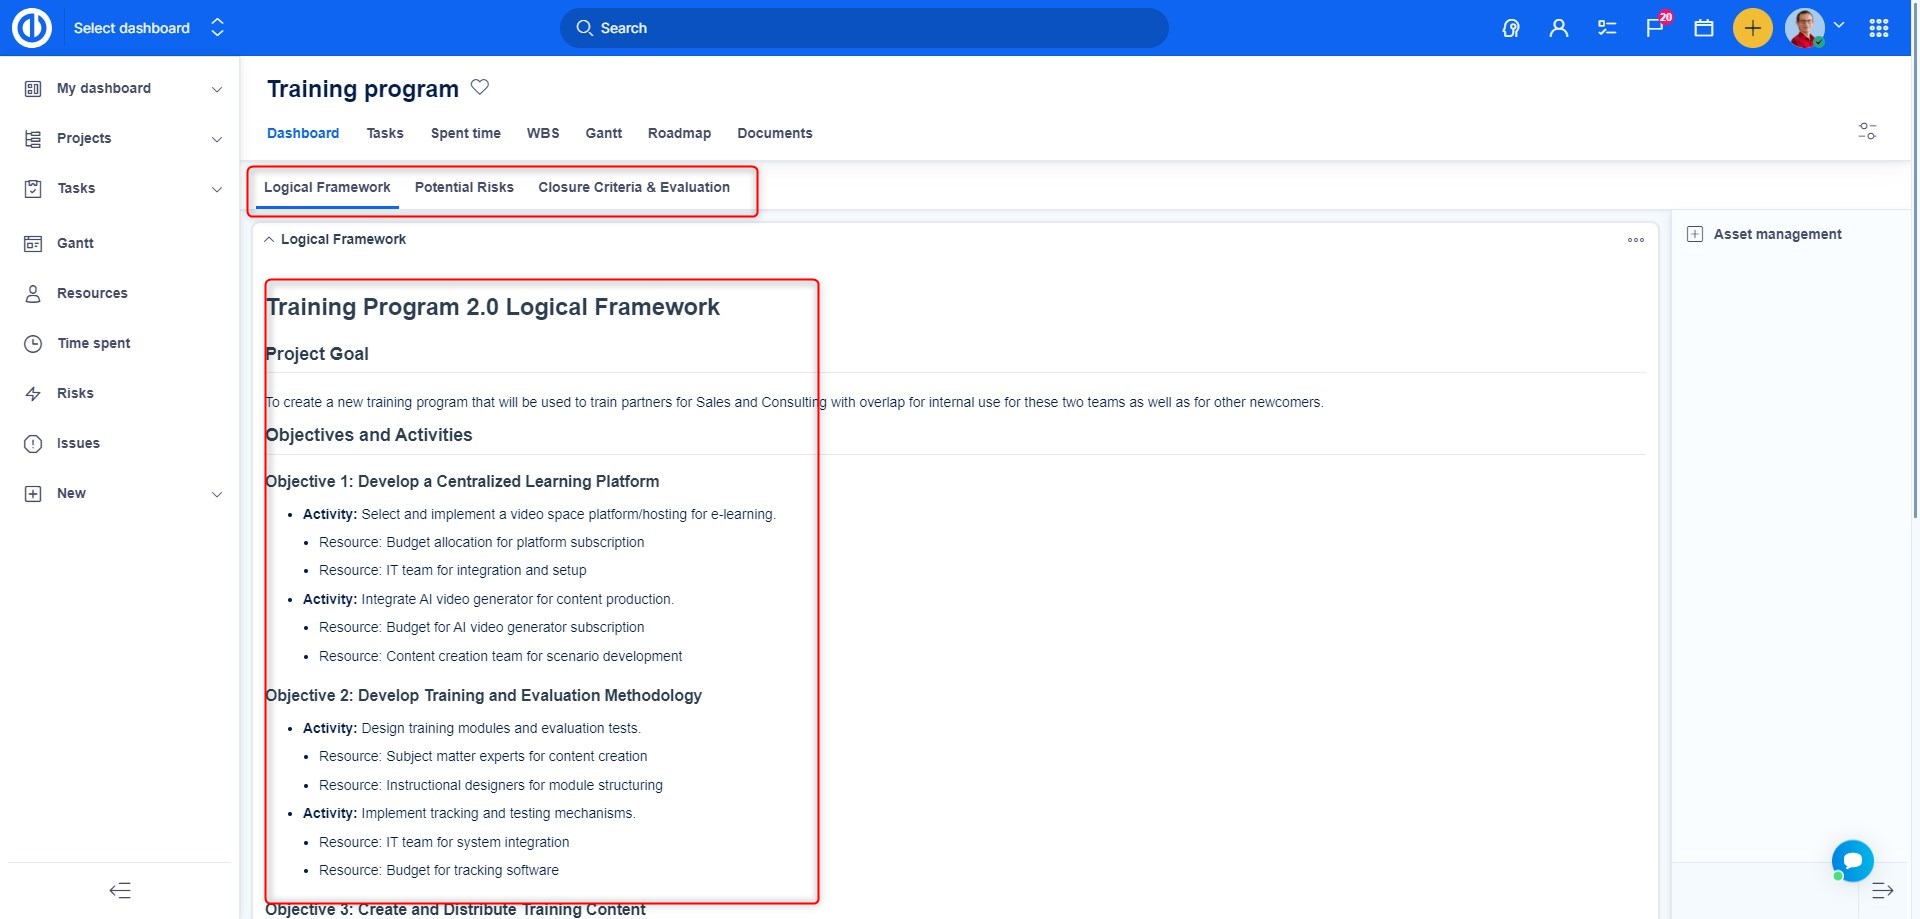
The AI Project Planner reads uploaded PDFs containing contracts or quotations, identifies action items within the text, and automatically generates a project plan consisting of tasks in WBS and Gantt and summarized project information on a dashboard.
We have crafted Easy AI prompts to use the best practices and timeless/proven-over-time Advanced Project management methods (such as Logical frame, Risk management, Stakeholder analysis etc) and instructed Easy AI to put this extremely valuable content directly on your project dashboard.
The project planner will fill in the following attributes: Subject, Description, Start dates, Due dates, Parent task, and Subtask.
How to use Project planner:
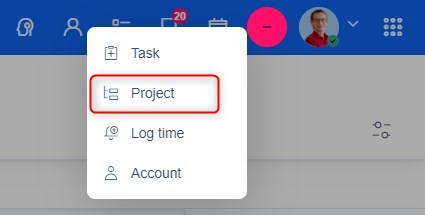
To use this feature, click on the plus button at the top and select Project.
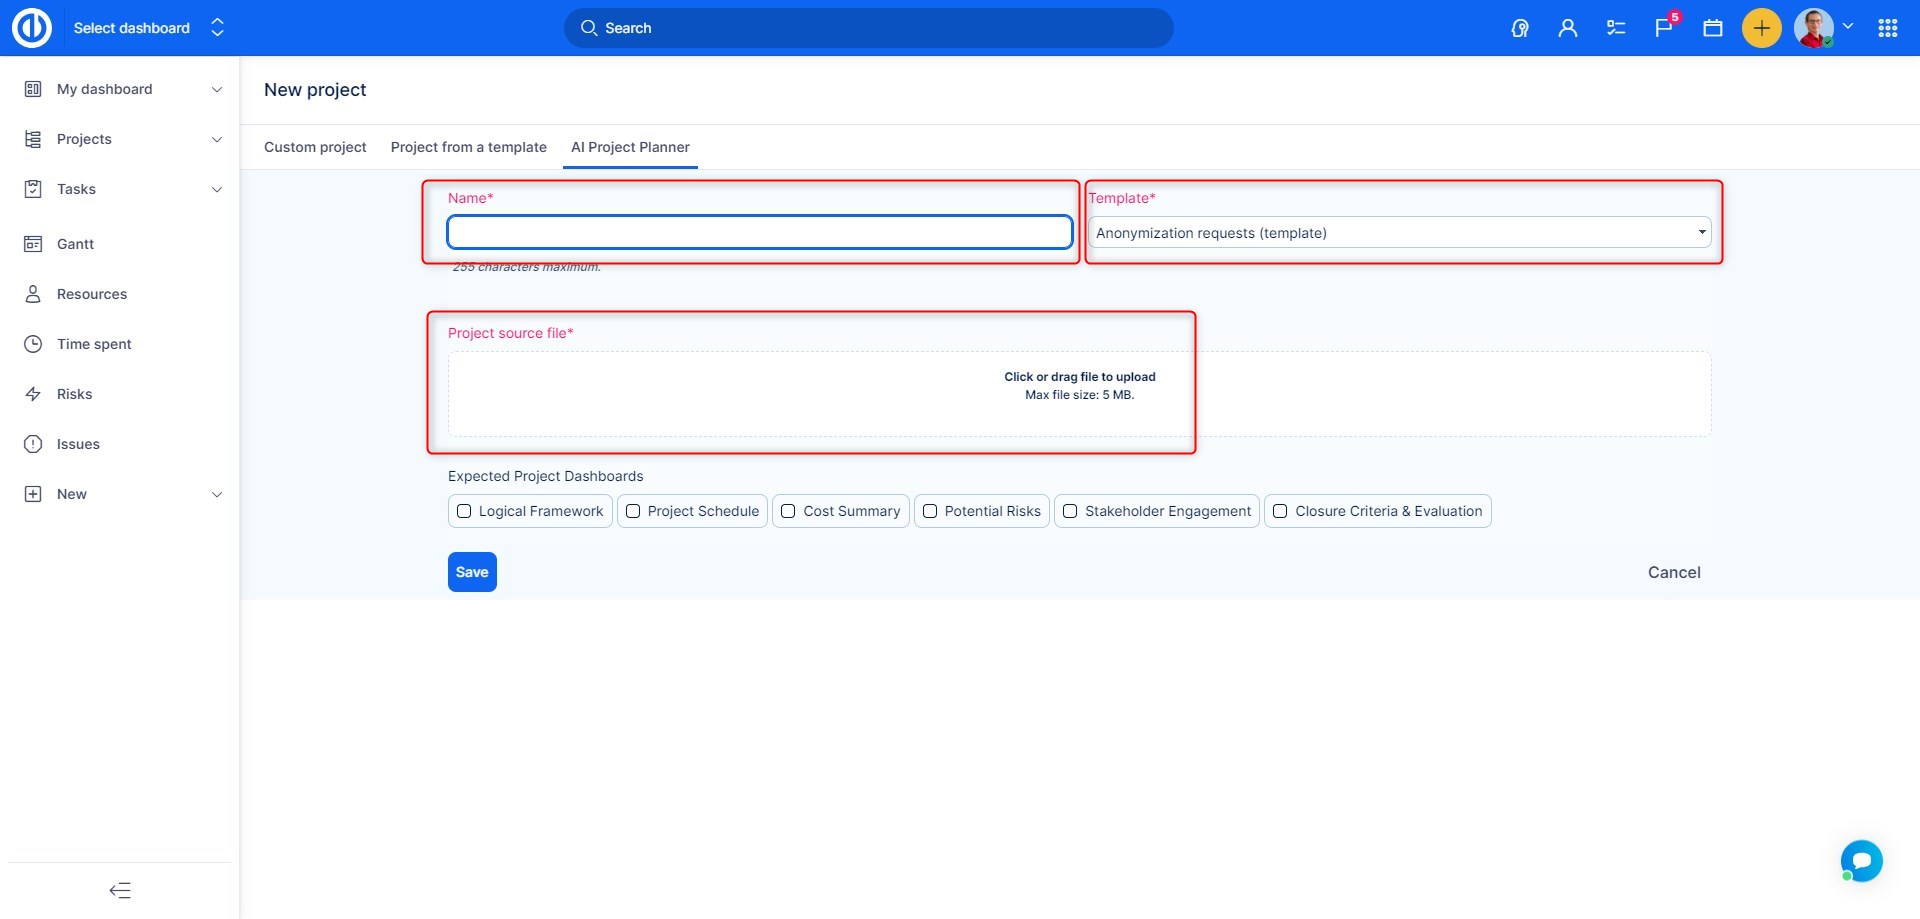
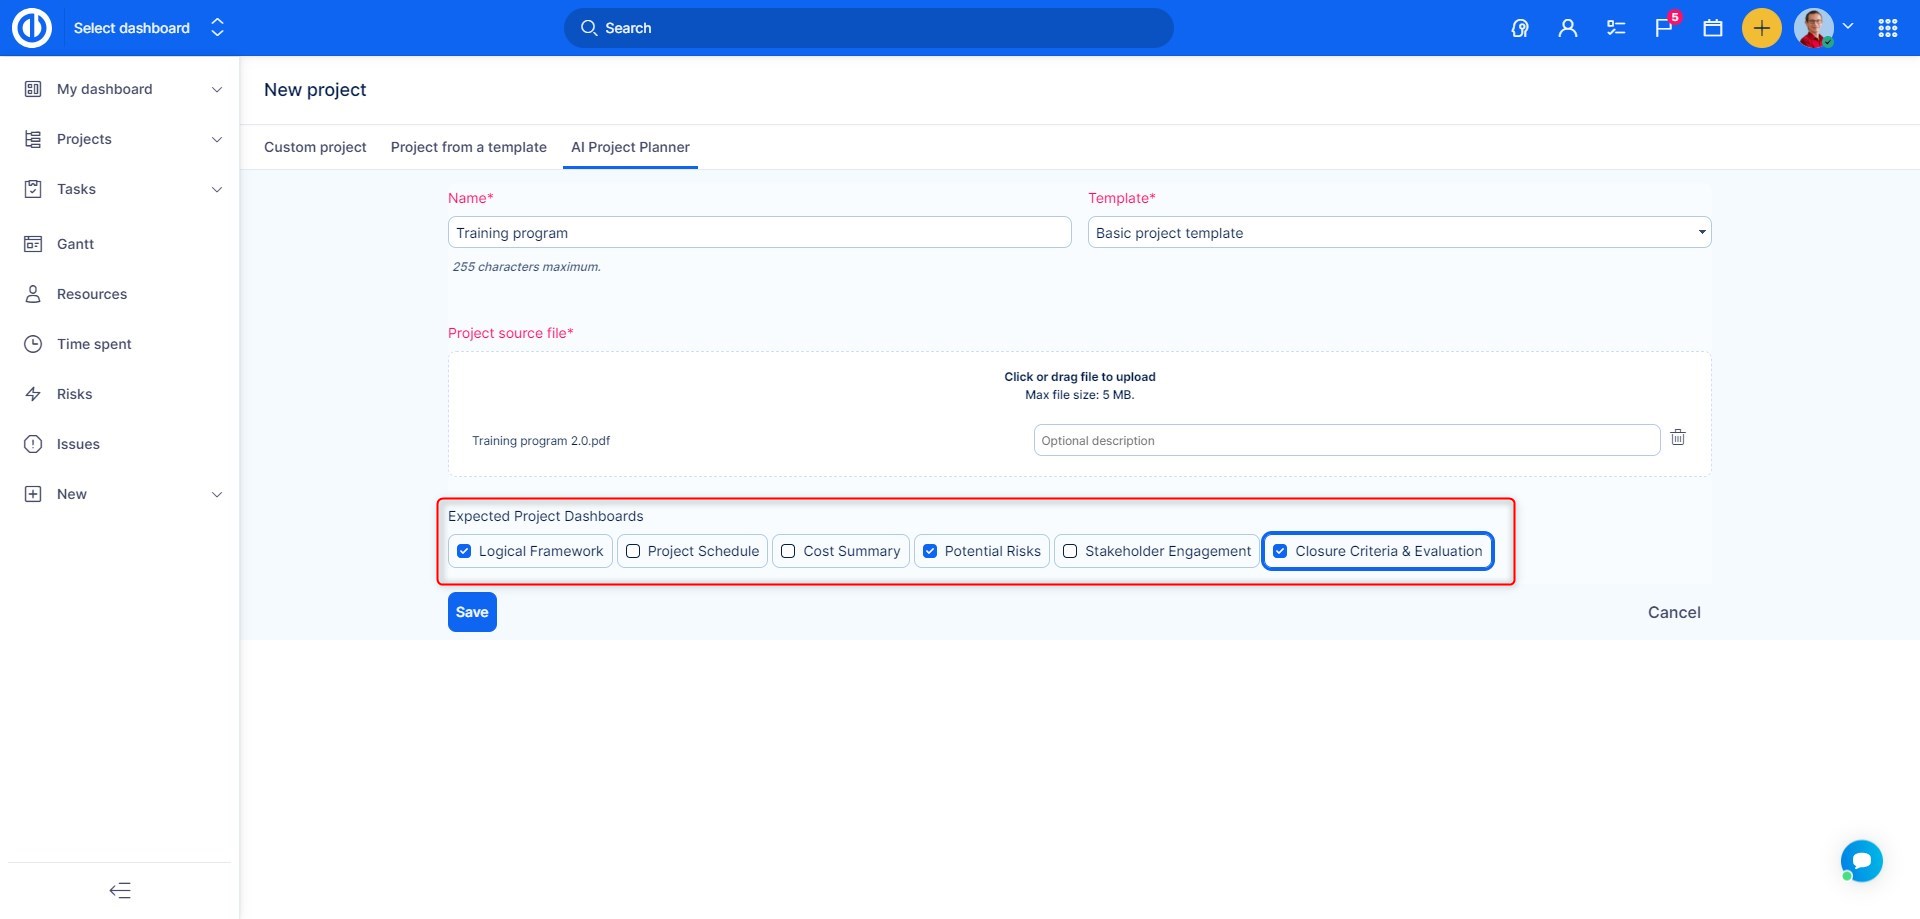
Here you will have the basic options to create a custom project, from a template, and most importantly, AI project planner
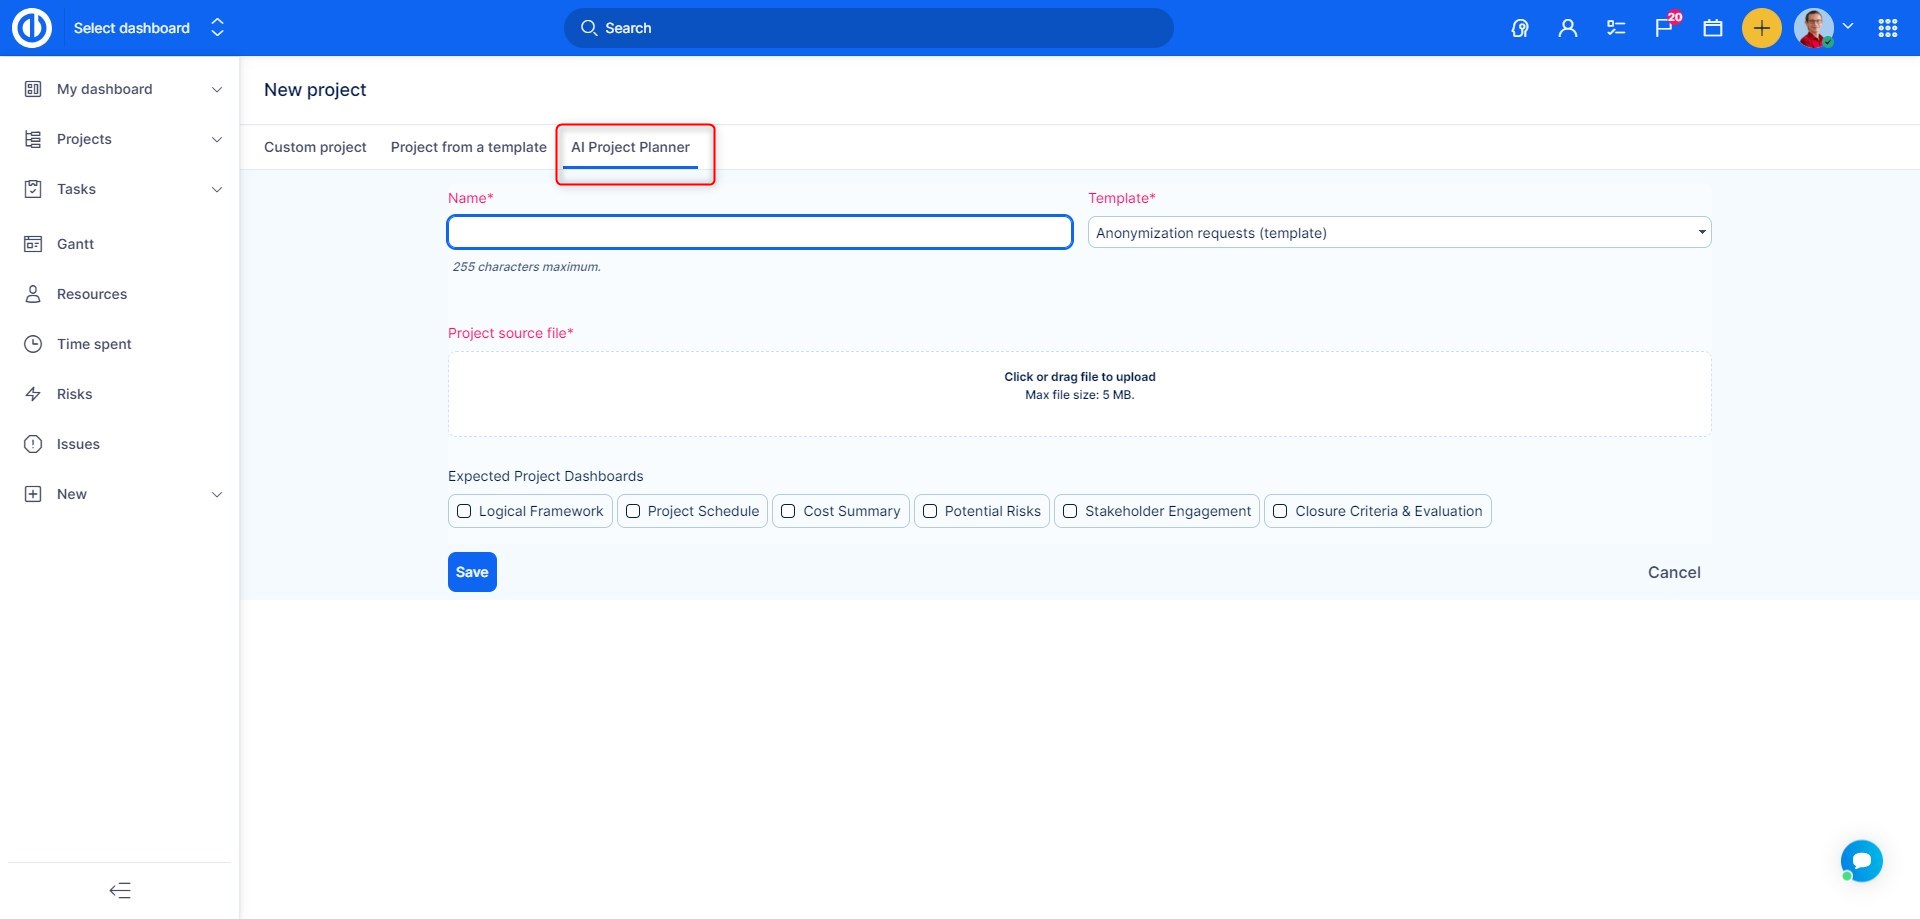
- Fill in the name of the project
- Select a project template -A project template defines the members, modules, and other basic settings of a project. To ensure the planner functions correctly, make sure the following modules are active: Task Tracking, Spent Time, WBS, Gantt, and Documents.
- Upload the file - Contract in a PDF format.
Here is an example of a file we used in this demonstration:

Once the documents are uploaded, you can select which predefined dashboards you would like to see on the newly created project.
Hit save sit back and relax. The project along with all the tasks and planning is being created right in front of your eyes.
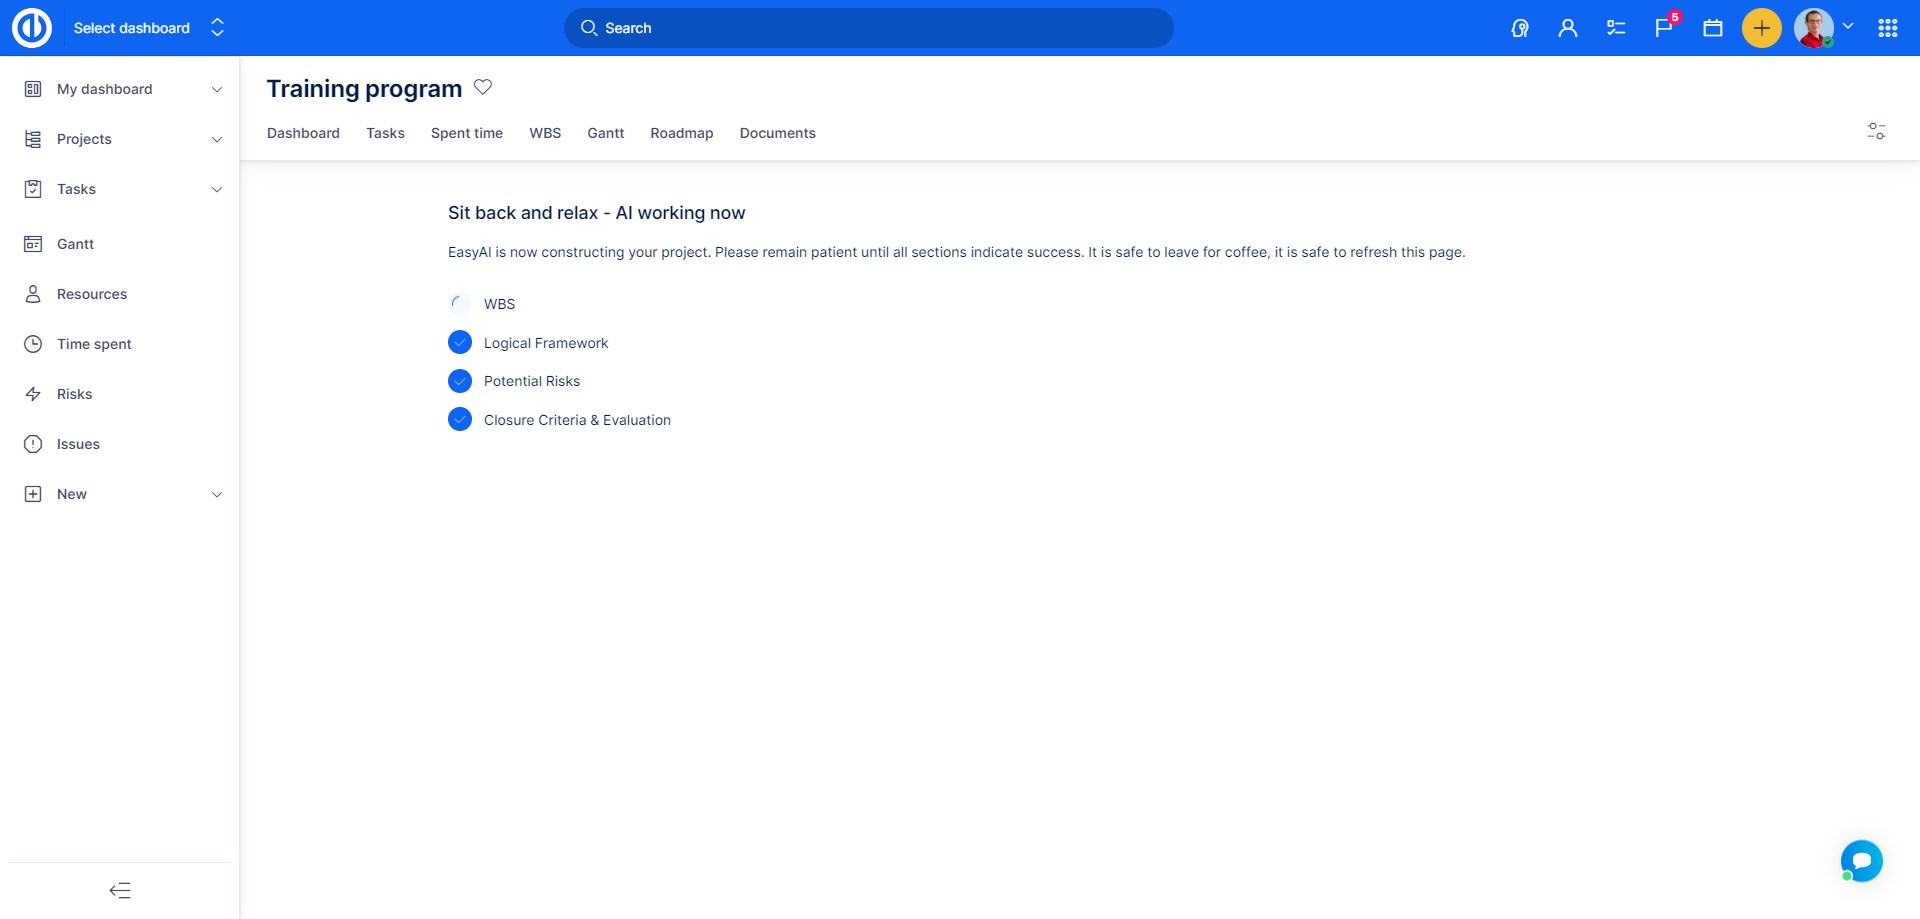
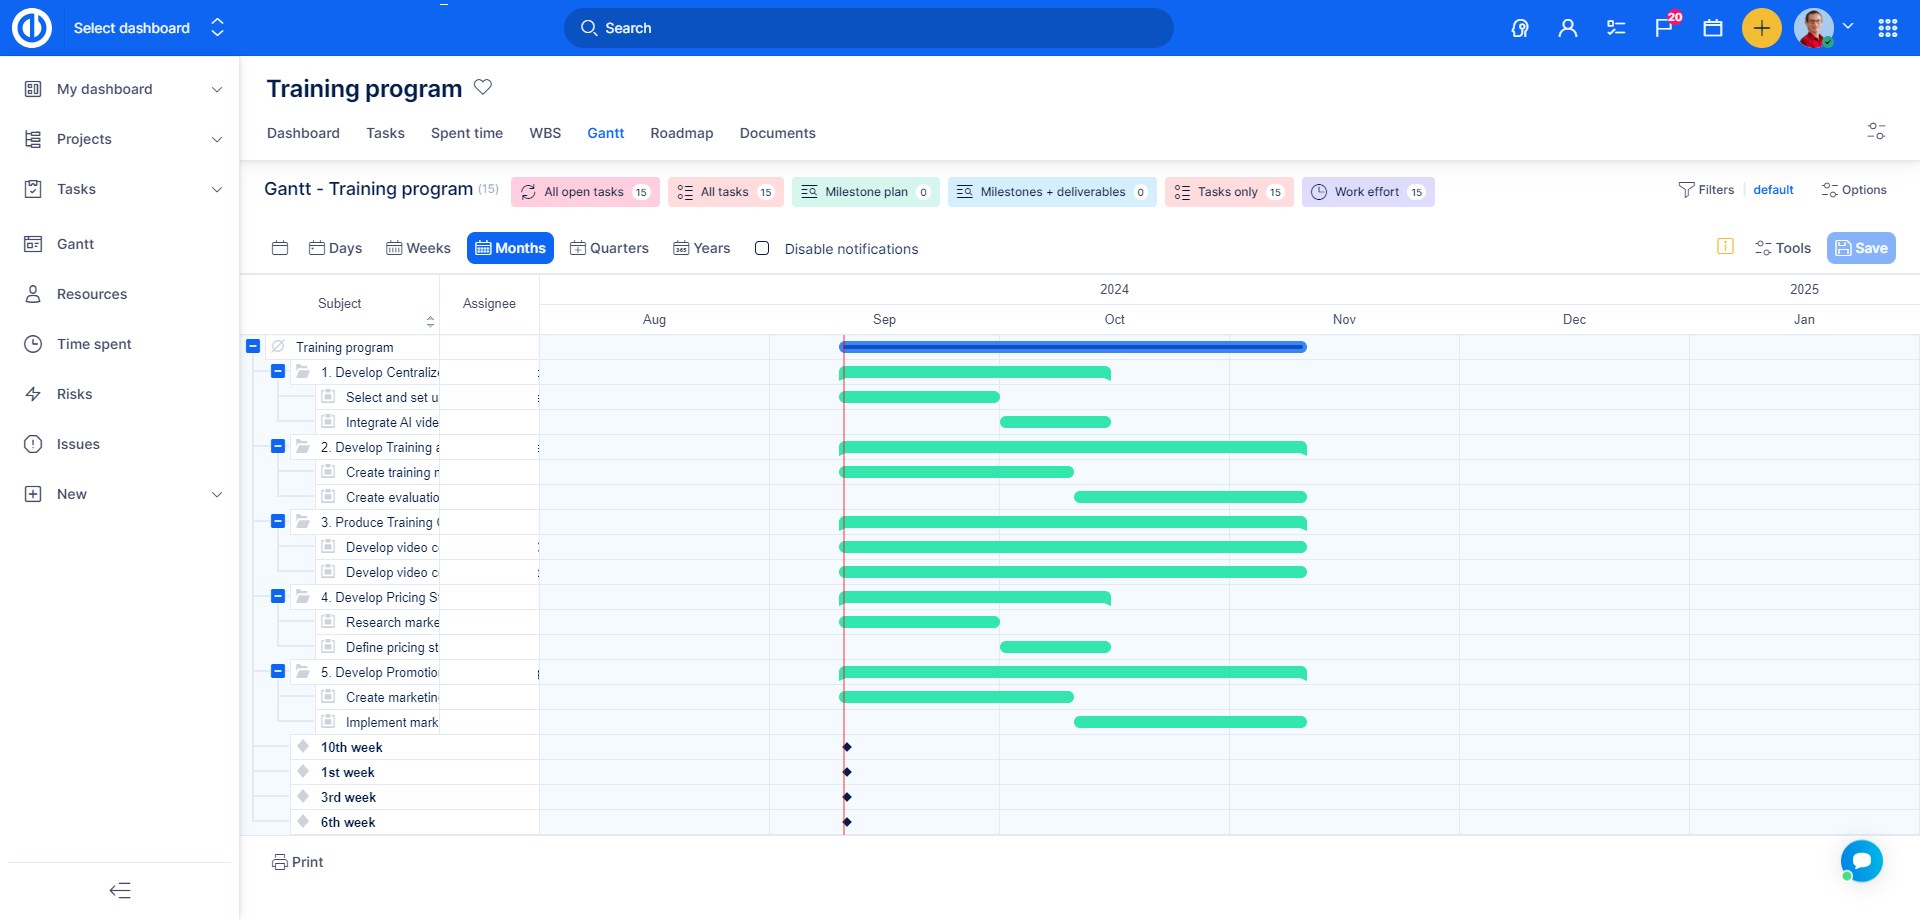
Selected dashboards with the data will appear and Tasks will be created, you can check them out in WBS, or Gantt view.
AI Project Status
AI Project Status is an advanced tool designed to keep projects on track by streamlining status report generation. It automatically compiles and analyzes project activities to create detailed and insightful status updates, ensuring that all team members and stakeholders stay informed.
Key Features:
- Simplify Status Reports: Significantly reduce the time spent on compiling and writing project status updates, boosting efficiency.
- Consistency in Reporting: Ensure a uniform format and consistent level of detail across all project status communications.
- Data-Driven Insights: Leverage AI to provide up-to-date, accurate project status information, helping teams make better decisions.
- Automated Scheduling: Set reports to be automatically generated and delivered at selected intervals, saving time and effort.
- Comprehensive Task Details: Get an in-depth overview of all project tasks, including completed, scheduled, modified, or problematic tasks, offering a full picture of the project's progress.
Activation
AI Project Status needs to be activated as a module per project.
Once activated, you will find its tab on the project's top bar for easy access.

On the newly activated tab, you will see the following page where you need to set up the report.
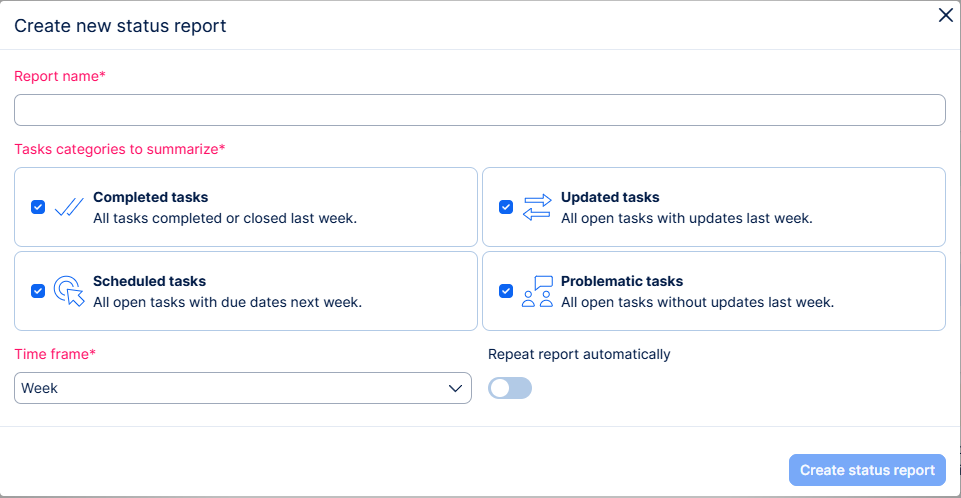
You will be asked to provide a report name, select task categories to summarize (completed tasks, updated tasks, scheduled tasks, problematic tasks), define the timeframe, and specify whether the report should be repeated.
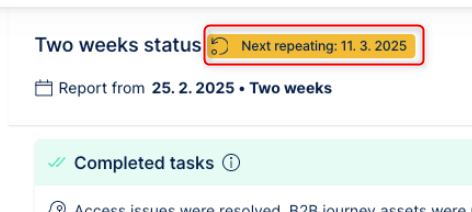
Repeated report will be generated automatically based on the timeframe setting. Next repeating is visible in the report detail:
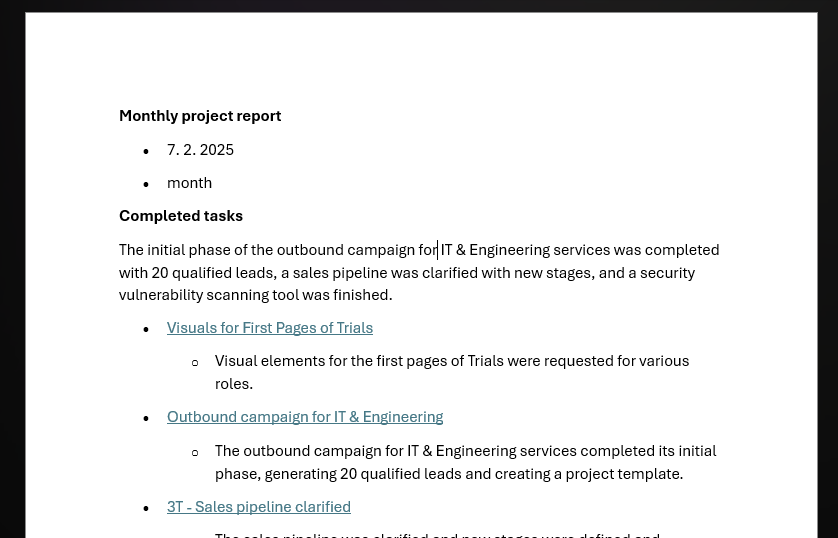
Once the report is set up, you will see the following page, which displays an active report with relevant information.
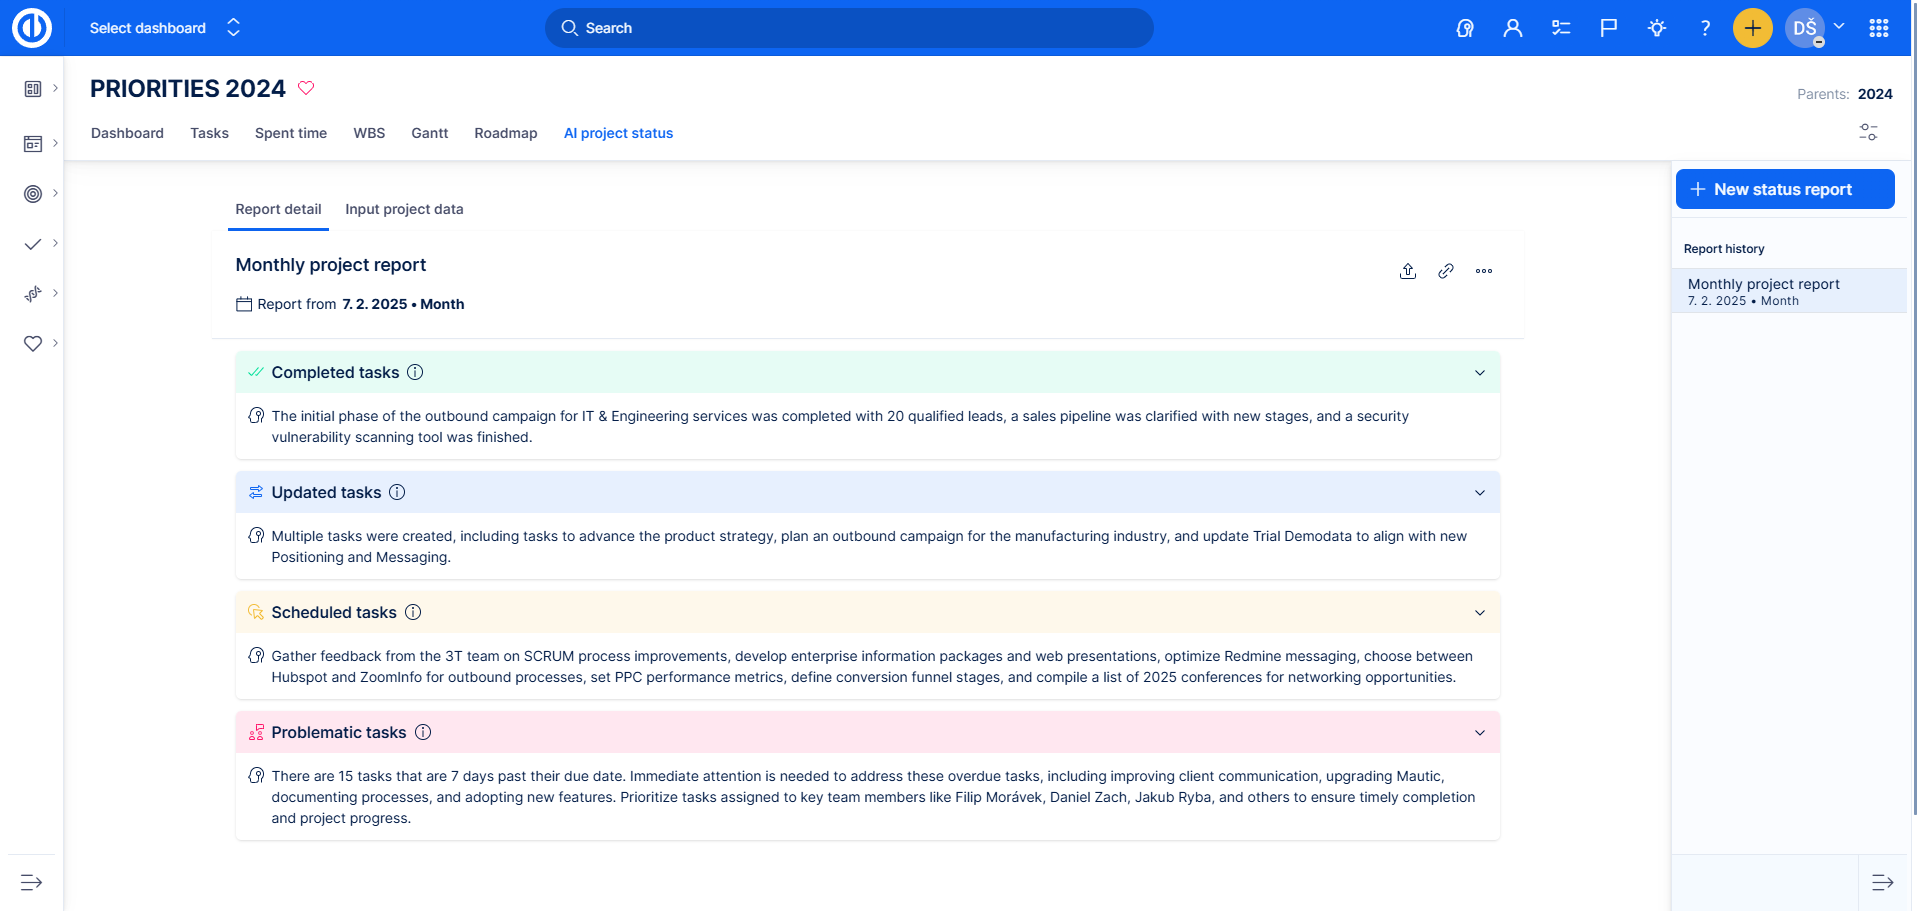
By clicking on each section, you can view tasks within the respective category.
Each task in the list includes a summary, providing a clear and concise overview. Tasks will open in the quick task view when clicked.
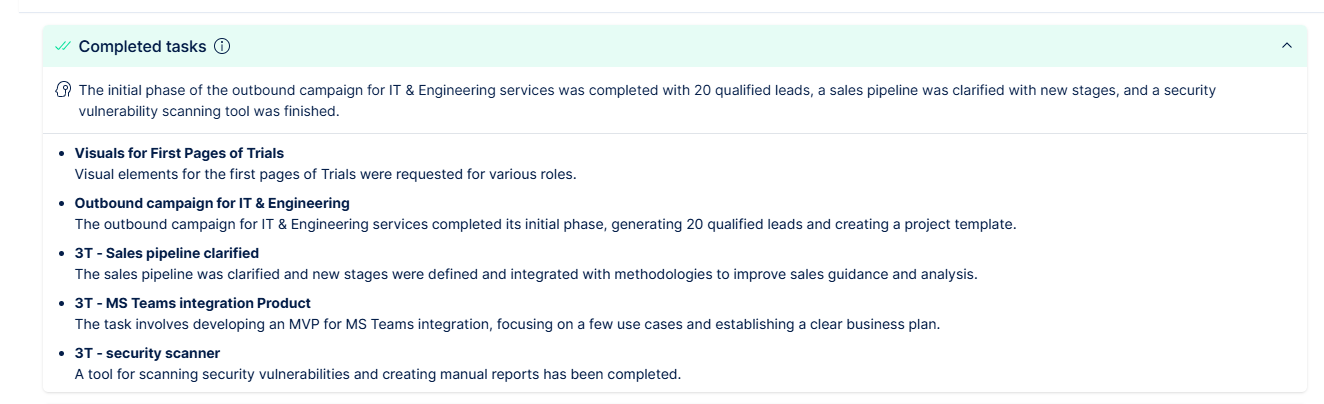
- Completed tasks - Summary of all tasks that were completed or closed in the last month
- Updated tasks - Summary of all open tasks that were updated in the last month
- Scheduled tasks - Summary of all open tasks with due dates in the next month, sorted by priority and due dates
- Problematic tasks - Summary of all open tasks with due date in last month but without any updates

At the top right side you will find the following options:
- Copy project status report content - Copy the report to clipboard, in form of text and links to singular tasks, to be pasted into fe. Email or document
- Copy Link to project status report detail - copy the URL of the report for easy sharing
- Delete status report - permanently deletes the current report
Cancel future reports - this option will be there in case the report is set for repeating
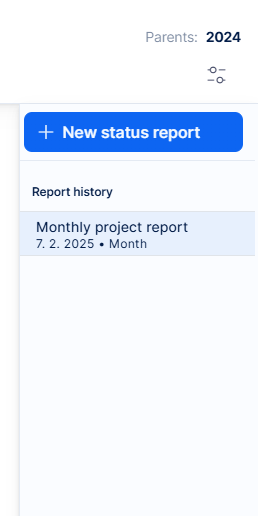
On the right side of the report, you will find an option to create a new status report, as well as a Report History section. Here, you can access all previous reports, especially if you have set up a repeating report.
Service AI
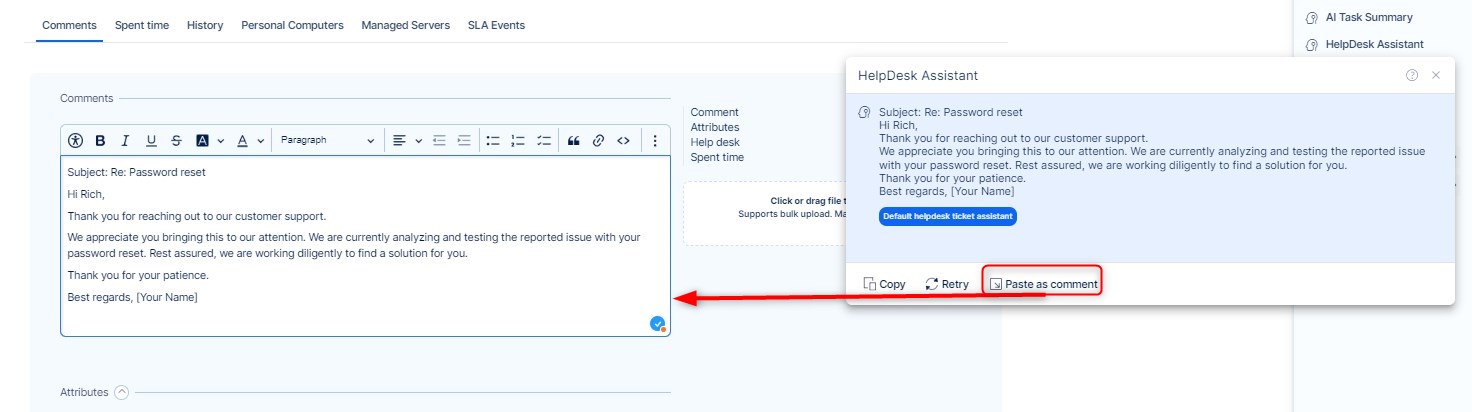
HelpDesk Assistant
The HelpDesk Assistant reads incoming client questions in the ticket description and discussion in the comments. In next step, it generates draft responses using Easy AI’s language model, and company knowledge from Knowledge Assistant, including historical data from the open and closed help desk tasks in the database.
It analyzes the content of the ticket, identifies the issue, and drafts a suitable reply based on previous similar cases and available knowledge resources.
This assistant will appear in the right-side menu of a Helpdesk task. ( Set up in HelpDesk)

After clicking on the icon you will have the option to select a prompt template. There is always one set by default. Click on it and the assistant will generate a response:

Once the response is generated, you are able to copy the response, or you can directly paste it into the comments via the appropriate button. Then you can add changes( fill in names etc.) and process the ticket as usual.
Global settings
Settings can be accessed via Administration>> AI assistant Dashboard, here on the right side you will find several options.
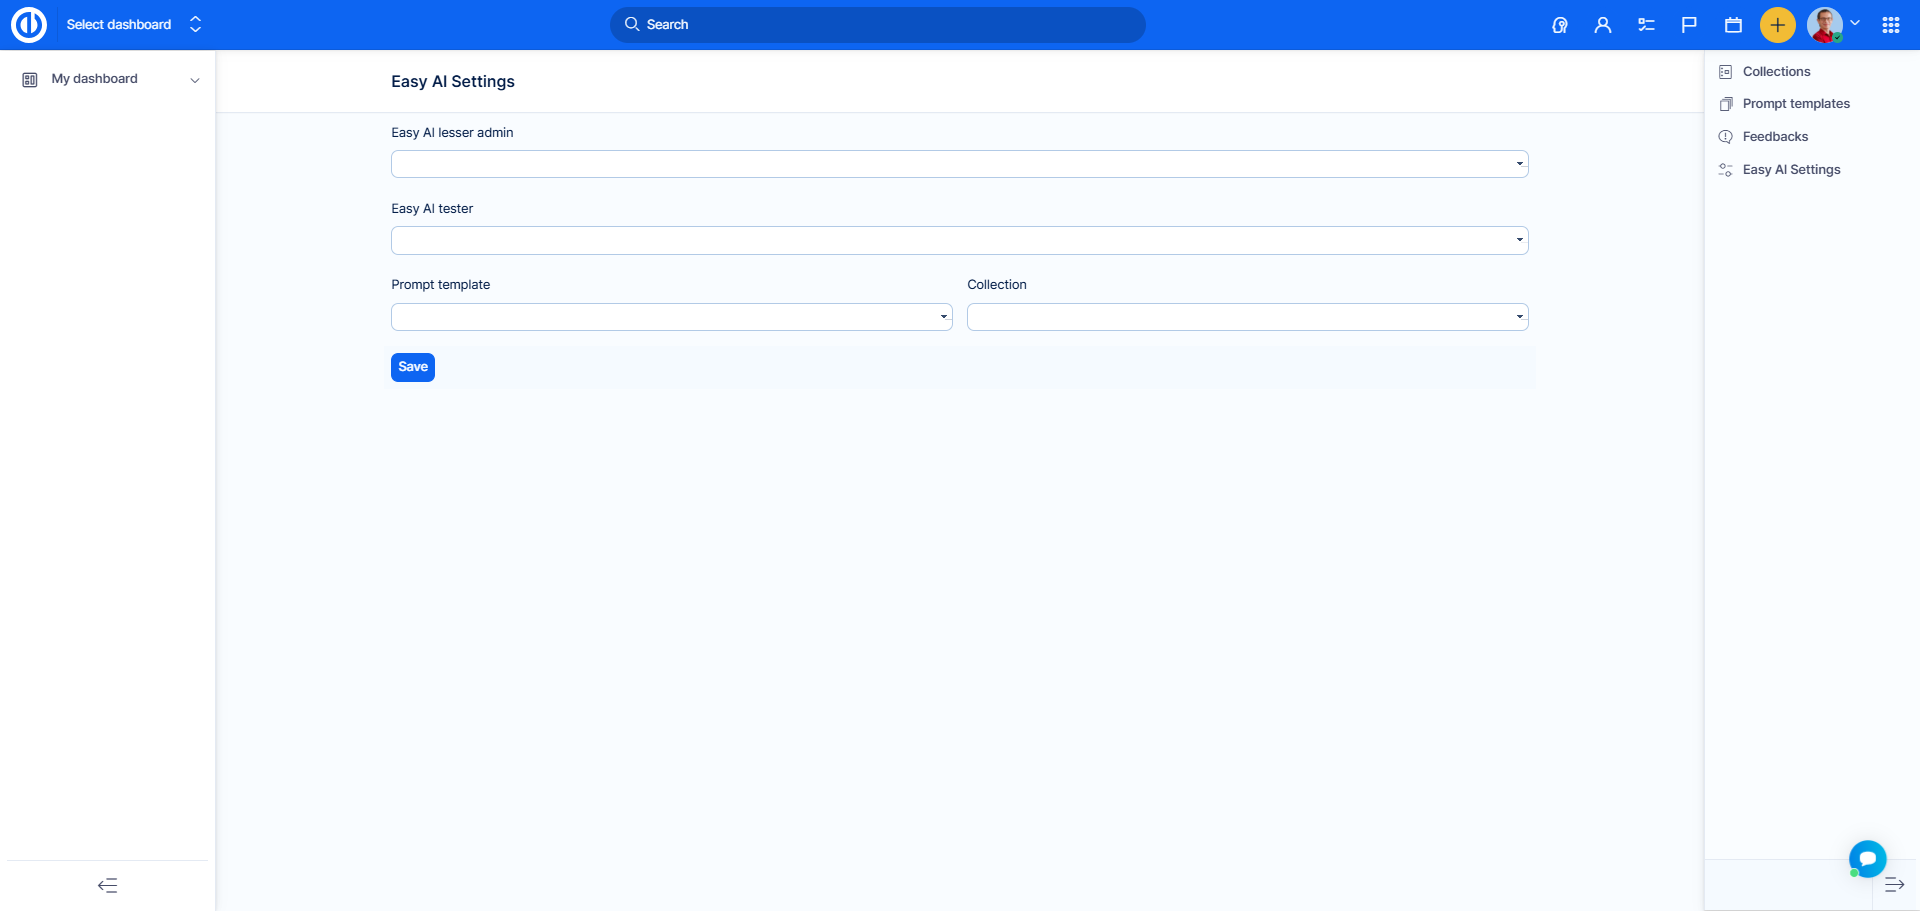
Easy AI settings
This section will lead to the following settings page. Here you can select AI admin, AI tester and set which collection, prompt template should be used by default.
Collections
The collection is a set of data sources with knowledge, that will be used by the language model to answer your questions. Details are described in the sections above.
Prompt templates
You can of course create your own custom prompt template. This can be done in Adminsitration >> AI assistant dashboard - Prompt templates.
The prompt template includes instructions for the language model to specify the response. It represents a use case, in which the AI Assistants help.
In this section, you will find pre-created templates, which can be used right away, as well as any newly created prompts.
Created prompts cannot be edited, but can be deleted- We advise to not delete prompts. Deleting is an irreversible action. You will not be able to delete the Built-in prompts.
Creating a new prompt
To create a new prompt, click on the button New prompt template
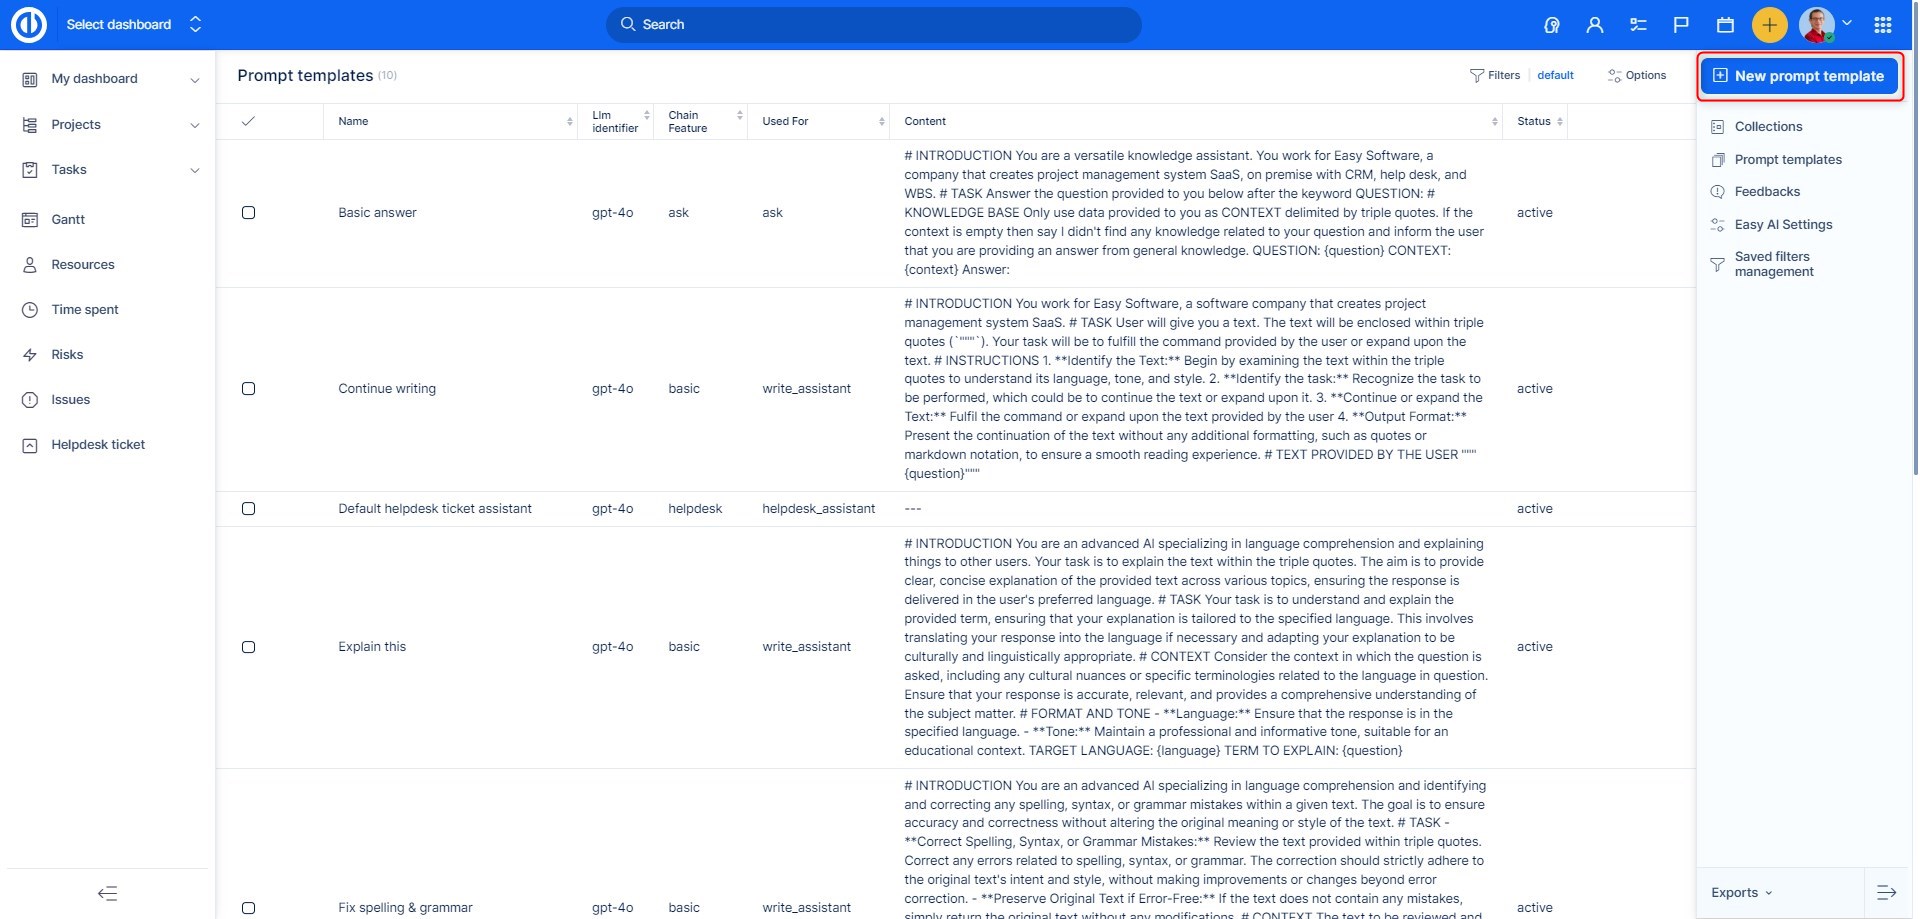
In the form you will select the following:
-
What is the template used for - Knowledge assistant, AI task summary, Write assistant, Helpdesk assistant
- This will select the chain feature automatically for you
- Name - Is displayed as an option in AI Assistants
-
Status -
- Active - visible for all users
- Inactive - not visible for all users, including Admins
- Testing - visible only for users selected in Easy AI Settings
- Content - What will the assistant do (more details below)
- Collections - Which collection it should use
- Short description
Note: There is no content space for a prompt in the Helpdesk Assistant feature as this assistant already uses a set of specific built-in prompts to provide the results.

Building content
Define instruction for the language model according to your use case. It is necessary to use tokens for user inputs. Each type of assistant uses different tokens, they will be suggested to you under the Content box, as blue buttons.
Click on the button and the token will be added to the field.
Here is a list of available tokens and a short description of what they are used for:
- {question} → Represents the user's input to the AI assistant.
This token captures the specific question or command entered by the user to initiate a query or request.
- {language} → A variable pulled from the global settings.
This determines the language settings configured in the system, typically the user's preferred language for interaction.
- {in_language_name} → A variable identifying the language of the task description.
It ensures the system understands the language in which the task description is written for accurate processing or translation.
- {issue_description} → The text of the task description variable.
This token stores the content describing the task, used for reference, updates, or sharing.
- {context} → The context of the task.
Includes all relevant information about the task, such as associated project, assignee, and priority, to ensure accurate understanding and execution.
- {text} → Context from the knowledge base (collections) or RAG (Red-Amber-Green) database.
Provides additional information or predefined content pulled from documentation or task-specific guidelines to assist the user.
Here is an example of what content can look like:

Easy AI Activation per User
Using Easy AI is not only about enabling it globally in the system administration. Each user must have the Easy AI assistants active option enabled in their user profile.
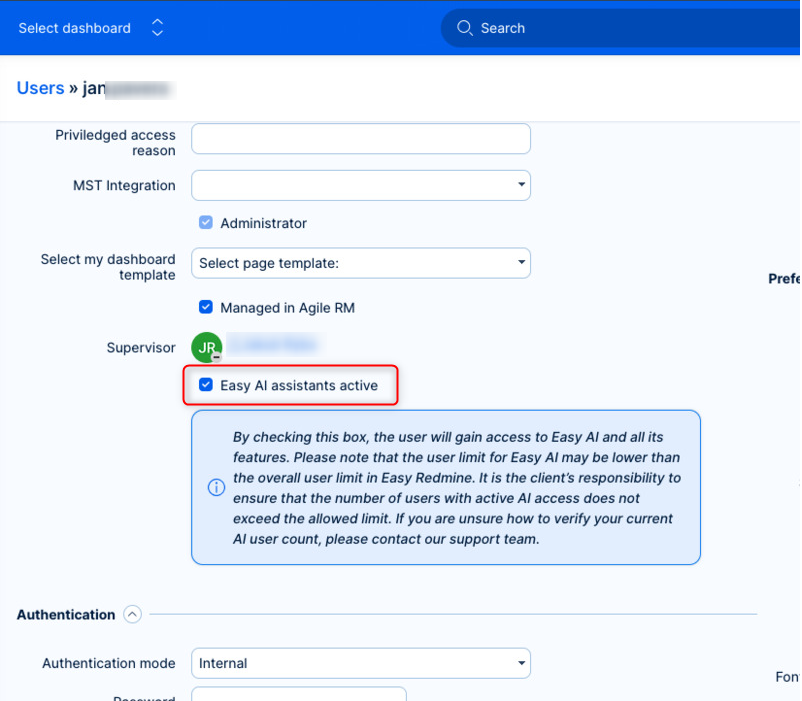
- If this option is not checked, the user will not see any AI assistants in the application.
- This applies even to administrators – they also need to have the "Easy AI assistants active" option checked to access AI features.
- This setting allows organizations to control exactly which users have access to Easy AI functionalities.
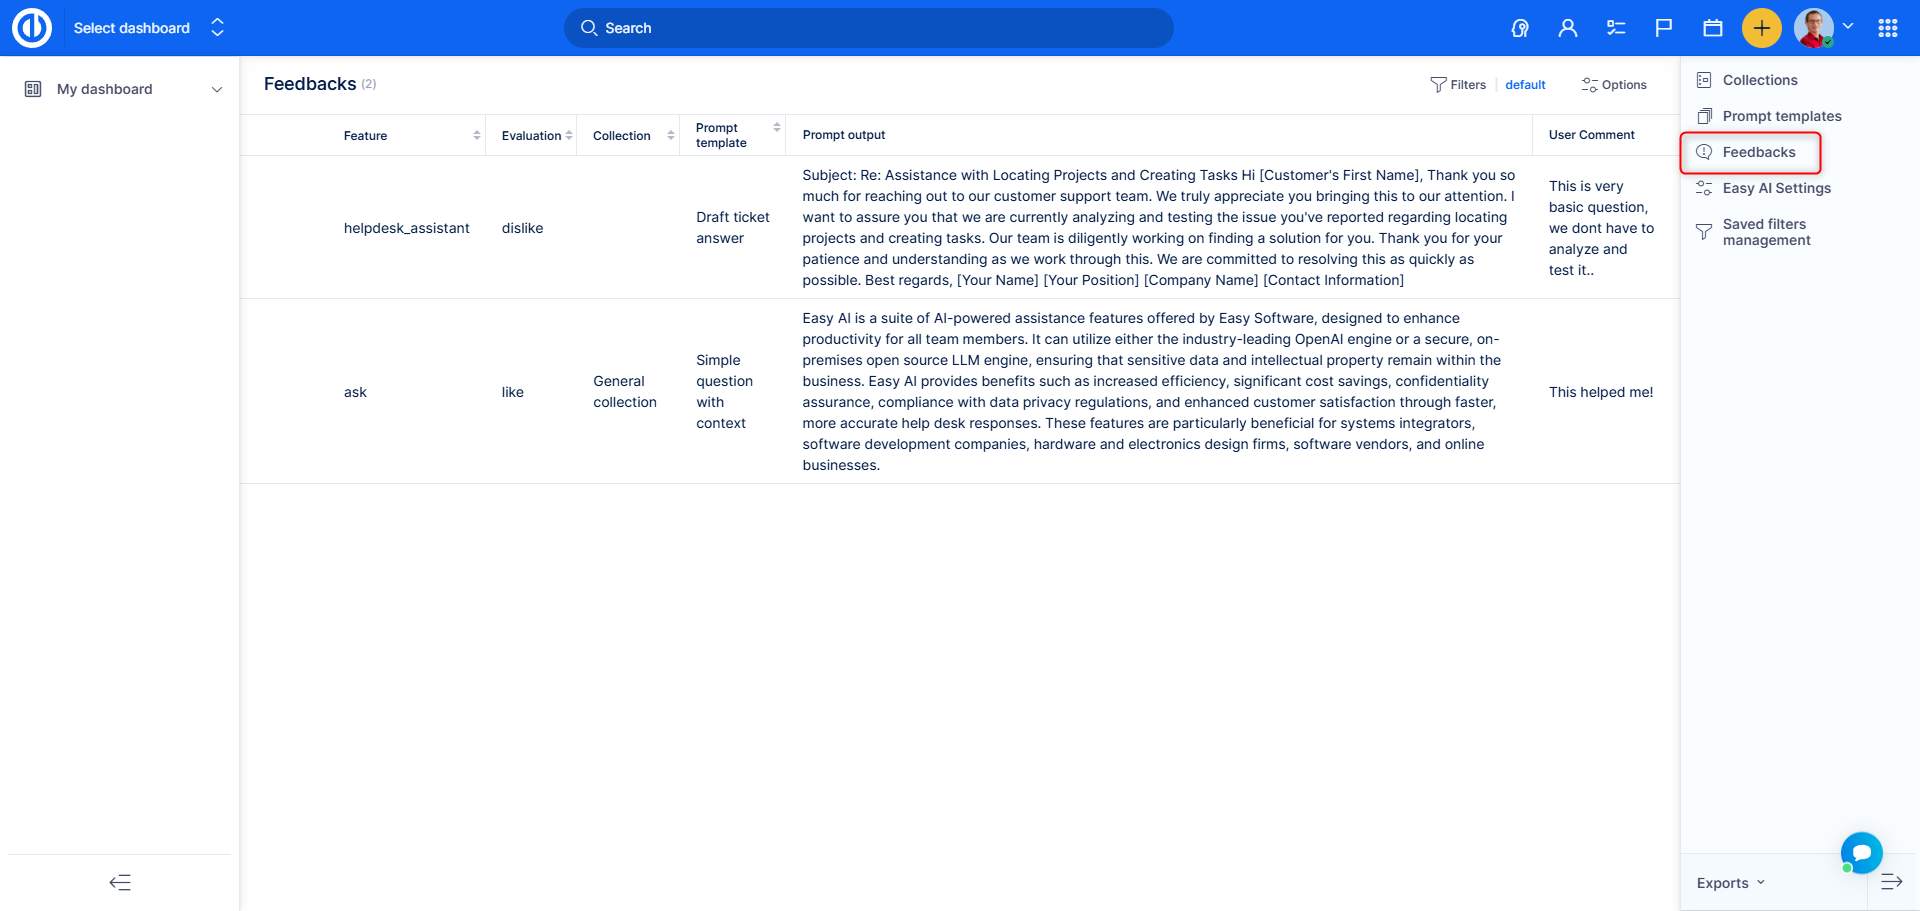
Feedbacks
Feedback helps gather valuable information from users. The AI admin can review this feedback and, if necessary, edit prompts to improve future results.
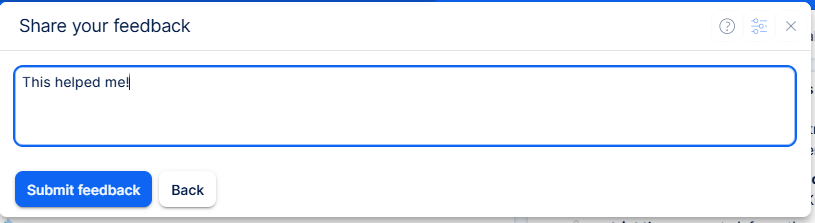
The option to provide feedback is available with results, indicated by two smiley faces at the bottom right corner.
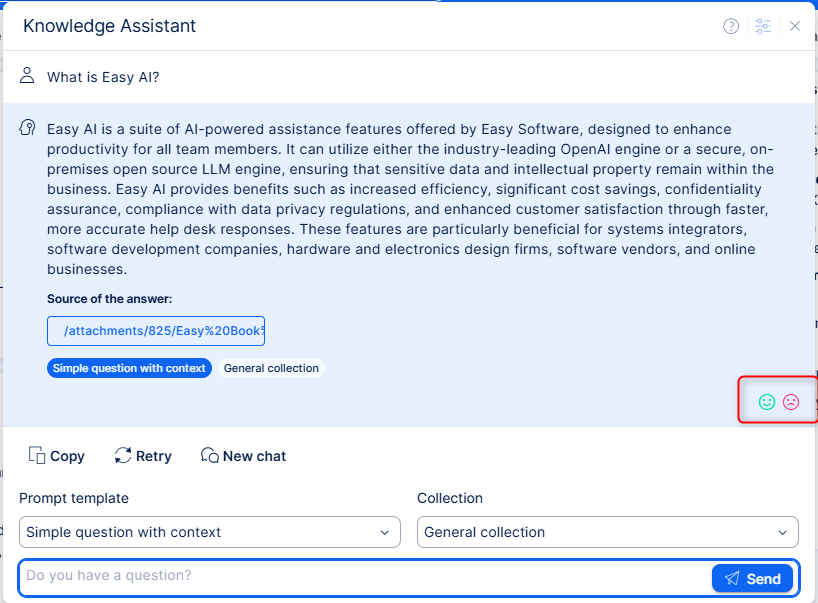
Select either the green or red smiley, and in the next step, you’ll be prompted to provide details in writing.
Once the feedback is submitted, the AI admin can find it under the 'Feedbacks' button in the AI Overview section of the administration panel.